


Page 17 - CC2017_ID_Look_Inside
P. 17
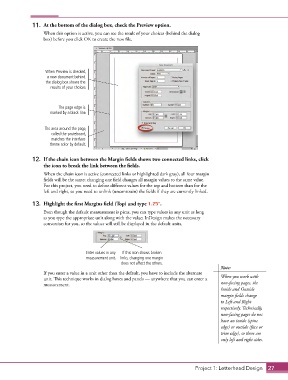
11.  At the bottom of the dialog box, check the Preview option.
                   When this option is active, you can see the result of your choices (behind the dialog
                   box) before you click OK to create the new file.


                    When Preview is checked,
                    a new document behind
                    the dialog box shows the
                      results of your choices.


                         The page edge is
                      marked by a black line.


                   The area around the page,
                      called the pasteboard,
                      matches the interface
                      theme color by default.


               12.  If the chain icon between the Margin fields shows two connected links, click
                   the icon to break the link between the fields.
                   When the chain icon is active (connected links or highlighted dark gray), all four margin
                   fields will be the same; changing one field changes all margin values to the same value.
                   For this project, you need to define different values for the top and bottom than for the
                   left and right, so you need to unlink (unconstrain) the fields if they are currently linked.


               13.  Highlight the first Margins field (Top) and type 1.25”.
                   Even though the default measurement is picas, you can type values in any unit as long
                   as you type the appropriate unit along with the value; InDesign makes the necessary
                   conversion for you, so the values will still be displayed in the default units.


                                    Enter values in any   If this icon shows broken
                                     measurement unit.  links, changing one margin
                                                   does not affect the others.
                                                                                            Note:
                   If you enter a value in a unit other than the default, you have to include the alternate
                   unit. This technique works in dialog boxes and panels — anywhere that you can enter a   When you work with
                   measurement.                                                             non-facing pages, the
                                                                                            Inside and Outside
                                                                                            margin fields change
                                                                                            to Left and Right
                                                                                            respectively. Technically,
                                                                                            non-facing pages do not
                                                                                            have an inside (spine
                                                                                            edge) or outside (face or
                                                                                            trim edge), so there are
                                                                                            only left and right sides.


                                                                                  Project 1: Letterhead Design  27

