


Page 21 - CC 2019 WD Look Inside
P. 21
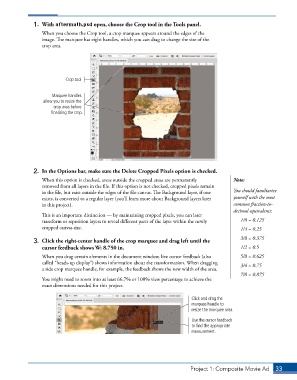
1.  With aftermath.psd open, choose the Crop tool in the Tools panel.
                 When you choose the Crop tool, a crop marquee appears around the edges of the
                 image. The marquee has eight handles, which you can drag to change the size of the
                 crop area.


                          Crop tool


                     Marquee handles
                  allow you to resize the
                      crop area before
                     finalizing the crop.


              2.  In the Options bar, make sure the Delete Cropped Pixels option is checked.
                 When this option is checked, areas outside the cropped areas are permanently   Note:
                 removed from all layers in the file. If this option is not checked, cropped pixels remain
                 in the file, but exist outside the edges of the file canvas. The Background layer, if one   You should familiarize
                 exists, is converted to a regular layer (you’ll learn more about Background layers later   yourself with the most
                 in this project).                                                         common fraction-to-
                                                                                           decimal equivalents:
                 This is an important distinction — by maintaining cropped pixels, you can later
                 transform or reposition layers to reveal different parts of the layer within the newly   1/8 = 0.125
                 cropped canvas size.                                                         1/4 = 0.25
                                                                                              3/8 = 0.375
              3.  Click the right-center handle of the crop marquee and drag left until the
                 cursor feedback shows W: 8.750 in.                                           1/2 = 0.5
                 When you drag certain elements in the document window, live cursor feedback (also   5/8 = 0.625
                 called “heads-up display”) shows information about the transformation. When dragging   3/4 = 0.75
                 a side crop marquee handle, for example, the feedback shows the new width of the area.
                                                                                              7/8 = 0.875
                 You might need to zoom into at least 66.7% or 100% view percentage to achieve the
                 exact dimensions needed for this project.

                                                                           Click and drag the
                                                                           marquee handle to
                                                                           resize the marquee area.
                                                                           Use the cursor feedback
                                                                           to find the appropriate
                                                                           measurement.


                                                                          Project 1: Composite Movie Ad    33

