


Page 22 - CC 2019 WD Look Inside
P. 22
4.  Repeat Step 3 with the bottom-center handle until feedback shows the
              area of H: 11.250 in.
                                                                                        Note:

                                                                                        You can press the Escape
                                                                                        key to cancel the crop
                                                                                        marquee and return to
                                                                                        the uncropped image.


                                                                                        Note:
                                                                                        You can rotate a crop
                                                                                        marquee by placing the
               Remember, the defined trim size is 8.53 1 113 for this ad. Anything that runs to the   cursor slightly away
               page edge has to incorporate a 0.1253 bleed allowance, so the actual canvas size must   from a corner handle.
               be large enough to accommodate the bleed allowance on all edges:

                   [Width]   8.53 + 0.1253 + 0.1253 = 8.75
                   [Height]   113 + 0.1253 + 0.1253 = 11.25

           5.  Zoom out until you can see the entire canvas in the document window.

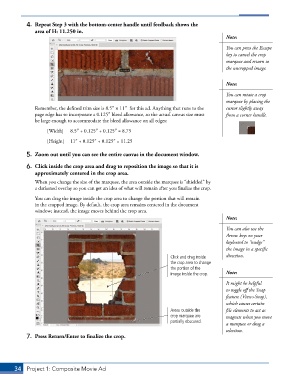
           6.  Click inside the crop area and drag to reposition the image so that it is
              approximately centered in the crop area.
               When you change the size of the marquee, the area outside the marquee is “shielded” by
               a darkened overlay so you can get an idea of what will remain after you finalize the crop.

               You can drag the image inside the crop area to change the portion that will remain
               in the cropped image. By default, the crop area remains centered in the document
               window; instead, the image moves behind the crop area.
                                                                                        Note:
                                                                                        You can also use the
                                                                                        Arrow keys on your
                                                                                        keyboard to “nudge”
                                                                                        the image in a specific
                                                                   Click and drag inside   direction.
                                                                   the crop area to change
                                                                   the portion of the
                                                                   image inside the crop.  Note:
                                                                                        It might be helpful
                                                                                        to toggle off the Snap
                                                                                        feature (View>Snap),
                                                                                        which causes certain
                                                                   Areas outside the    file elements to act as
                                                                   crop marquee are     magnets when you move
                                                                   partially obscured.
                                                                                        a marquee or drag a
                                                                                        selection.
           7.  Press Return/Enter to finalize the crop.


       34  Project 1: Composite Movie Ad

