


Page 66 - CC2018_WD_Look_Inside
P. 66
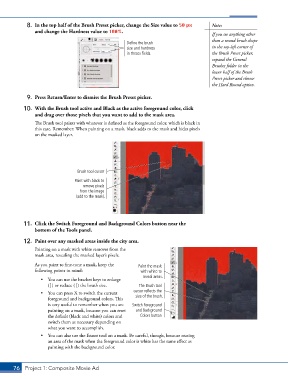
8.  In the top half of the Brush Preset picker, change the Size value to 50 px   Note:
               and change the Hardness value to 100%.
                                                                                        If you see anything other
                                                                                        than a round brush shape
                                                     Define the brush
                                                     size and hardness                  in the top-left corner of
                                                     in theses fields.                  the Brush Preset picker,
                                                                                        expand the General
                                                                                        Brushes folder in the
                                                                                        lower half of the Brush
                                                                                        Preset picker and choose
                                                                                        the Hard Round option.

            9.  Press Return/Enter to dismiss the Brush Preset picker.

           10.  With the Brush tool active and Black as the active foreground color, click
               and drag over those pixels that you want to add to the mask area.
               The Brush tool paints with whatever is defined as the foreground color, which is black in
               this case. Remember: When painting on a mask, black adds to the mask and hides pixels
               on the masked layer.


                                 Brush tool cursor
                                Paint with black to
                                   remove pixels
                                  from the image
                                (add to the mask).


           11.  Click the Switch Foreground and Background Colors button near the
               bottom of the Tools panel.

           12.  Paint over any masked areas inside the city area.
               Painting on a mask with white removes from the
               mask area, revealing the masked layer’s pixels.
               As you paint to fine-tune a mask, keep the   Paint the mask
               following points in mind:                   with white to
                                                            reveal areas.
                  •  You can use the bracket keys to enlarge
                     (]) or reduce ([) the brush size.    The Brush tool
                  •  You can press X to switch the current   cursor reflects the
                     foreground and background colors. This   size of the brush.
                     is very useful to remember when you are   Switch Foreground
                     painting on a mask, because you can reset   and Background
                     the default (black and white) colors and   Colors button
                     switch them as necessary depending on
                     what you want to accomplish.
                  •  You can also use the Eraser tool on a mask. Be careful, though, because erasing
                     an area of the mask when the foreground color is white has the same effect as
                     painting with the background color.


       76 Project 1: Composite Movie Ad

