


Page 64 - CC2018_WD_Look_Inside
P. 64
edit A lAyer mAsk
          In the previous exercise, you created a mask based on a selected color range.
          Depending on how you clicked to select the color range, you might have small areas of
          selected color in the city area, or small areas of unselected color in the sky. Rather than
          trying to isolate small spots of color in the Color Range dialog box, you can manually
          edit the mask using the built-in painting tools.

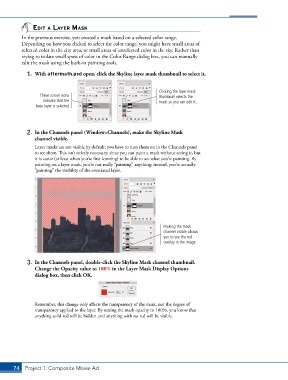
            1.  With aftermath.psd open, click the Skyline layer mask thumbnail to select it.


                                                                   Clicking the layer mask
                  These corner icons                               thumbnail selects the
                   indicate that the                               mask so you can edit it.
                base layer is selected.


            2.  In the Channels panel (Window>Channels), make the Skyline Mask
               channel visible.
               Layer masks are not visible by default; you have to turn them on in the Channels panel
               to see them. This isn’t strictly necessary, since you can paint a mask without seeing it, but
               it is easier (at least when you’re first learning) to be able to see what you’re painting. By
               painting on a layer mask, you’re not really “painting” anything; instead, you’re actually
               “painting” the visibility of the associated layer.


                                                                    Making the mask
                                                                    channel visible allows
                                                                    you to see the red
                                                                    overlay in the image.


            3.  In the Channels panel, double-click the Skyline Mask channel thumbnail.
               Change the Opacity value to 100% in the Layer Mask Display Options
               dialog box, then click OK.


               Remember, this change only affects the transparency of the mask, not the degree of
               transparency applied to the layer. By setting the mask opacity to 100%, you know that
               anything solid red will be hidden and anything with no red will be visible.


       74 Project 1: Composite Movie Ad

