


Page 57 - CC2018_WD_Look_Inside
P. 57
seleCt A Color rAnge And CreAte A lAyer mAsk
              Many images have both hard and soft edges, and/or very fine detail that needs to be
              isolated from its background (think of a model’s blowing hair overlapping the title on
              the cover of a magazine). In this type of image, more sophisticated selection tools can
              be used to create a very detailed selection based on the color in the image.
                 Rather than simply deleting pixels, as you did for the lightning image, another
              option for isolating an object with a path is to create a layer mask that hides unwanted
              pixels. Areas outside the mask are hidden, but not deleted, so you can later edit the
              mask to change the visible part of the image.

                1.  With aftermath.psd open, hide all but the Skyline layer. Click the Skyline
                   layer to make it active.

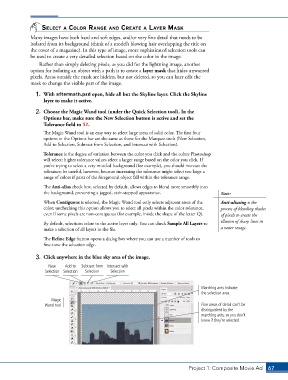
                2.  Choose the Magic Wand tool (under the Quick Selection tool). In the
                   Options bar, make sure the New Selection button is active and set the
                   Tolerance field to 32.
                   The Magic Wand tool is an easy way to select large areas of solid color. The first four
                   options in the Options bar are the same as those for the Marquee tools (New Selection,
                   Add to Selection, Subtract from Selection, and Intersect with Selection).

                   Tolerance is the degree of variation between the color you click and the colors Photoshop
                   will select; higher tolerance values select a larger range based on the color you click. If
                   you’re trying to select a very mottled background (for example), you should increase the
                   tolerance; be careful, however, because increasing the tolerance might select too large a
                   range of colors if parts of the foreground object fall within the tolerance range.
                   The Anti-alias check box, selected by default, allows edges to blend more smoothly into
                   the background, preventing a jagged, stair-stepped appearance.           Note:
                   When Contiguous is selected, the Magic Wand tool only selects adjacent areas of the   Anti-aliasing is the
                   color; unchecking this option allows you to select all pixels within the color tolerance,   process of blending shades
                   even if some pixels are non-contiguous (for example, inside the shape of the letter Q).  of pixels to create the

                   By default, selections relate to the active layer only. You can check Sample All Layers to   illusion of sharp lines in
                   make a selection of all layers in the file.                              a raster image.

                   The Refine Edge button opens a dialog box where you can use a number of tools to
                   fine-tune the selection edge.

                3.  Click anywhere in the blue sky area of the image.

                     New    Add to   Subtract from  Intersect with
                    Selection Selection  Selection  Selection


                                                                                    Marching ants indicate
                                                                                    the selection area.
                      Magic
                   Wand tool                                                        Fine areas of detail can’t be
                                                                                    distinguished by the
                                                                                    marching ants, so you don’t
                                                                                    know if they’re selected.


                                                                               Project 1: Composite Movie Ad    67

