


Page 54 - CC2018_WD_Look_Inside
P. 54
Understanding the Lasso Tools
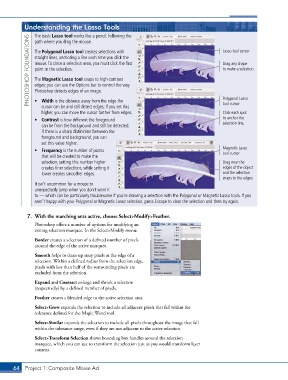
               The basic Lasso tool works like a pencil, following the
             PHOTOSHOP FOUNDATIONS  The Polygonal Lasso tool creates selections with         Lasso tool cursor
               path where you drag the mouse.


               straight lines, anchoring a line each time you click the
               mouse. To close a selection area, you must click the first
                                                                                             Drag any shape
               point in the selection.
                                                                                             to make a selection.
               The Magnetic Lasso tool snaps to high-contrast
               edges; you can use the Options bar to control the way
               Photoshop detects edges of an image.
               •  Width is the distance away from the edge the
                                                                                             tool cursor
                  cursor can be and still detect edges; if you set this
                  higher, you can move the cursor farther from edges.                        Polygonal Lasso
                                                                                             Click each spot
               •  Contrast is how different the foreground                                   to anchor the
                  can be from the background and still be detected;                          selection line.
                  if there is a sharp distinction between the
                  foreground and background, you can
                  set this value higher.
               •  Frequency is the number of points                                          Magnetic Lasso
                                                                                             tool cursor
                  that will be created to make the
                  selection; setting this number higher                                      Drag near the
                  creates finer selections, while setting it                                 edges of the object
                  lower creates smoother edges.                                              and the selection
                                                                                             snaps to the edges.
               It isn’t uncommon for a mouse to
               unexpectedly jump when you don’t want it
               to — which can be particularly troublesome if you’re drawing a selection with the Polygonal or Magnetic Lasso tools. If you
               aren’t happy with your Polygonal or Magnetic Lasso selection, press Escape to clear the selection and then try again.


            7.  With the marching ants active, choose Select>Modify>Feather.
               Photoshop offers a number of options for modifying an
               exiting selection marquee. In the Select>Modify menu:

               Border creates a selection of a defined number of pixels
               around the edge of the active marquee.

               Smooth helps to clean up stray pixels at the edge of a
               selection. Within a defined radius from the selection edge,
               pixels with less than half of the surrounding pixels are
               excluded from the selection.
               Expand and Contract enlarge and shrink a selection
               (respectively) by a defined number of pixels.

               Feather creates a blended edge to the active selection area.
               Select>Grow expands the selection to include all adjacent pixels that fall within the
               tolerance defined for the Magic Wand tool.
               Select>Similar expands the selection to include all pixels throughout the image that fall
               within the tolerance range, even if they are not adjacent to the active selection.
               Select>Transform Selection shows bounding box handles around the selection
               marquee, which you can use to transform the selection just as you would transform layer
               content.


       64 Project 1: Composite Movie Ad

