


Page 48 - CS6_GD_Look_Inside.pdf
P. 48
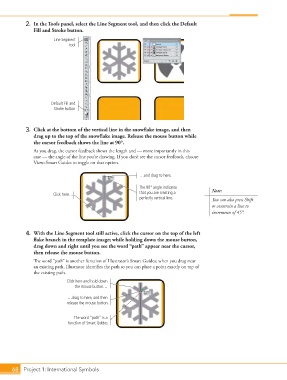
2.  In the Tools panel, select the Line Segment tool, and then click the Default
                    Fill and Stroke button.

                             Line Segment
                                   tool


                           Default Fill and
                            Stroke button


                 3.  Click at the bottom of the vertical line in the snowflake image, and then
                    drag up to the top of the snowflake image. Release the mouse button while
                    the cursor feedback shows the line at 90°.
                    As you drag, the cursor feedback shows the length and — more importantly in this
                    case — the angle of the line you’re drawing. If you don’t see the cursor feedback, choose
                    View>Smart Guides to toggle on that option.


                                                                …and drag to here.

                                                                The 90° angle indicates      Note:
                            Click here…                         that you are creating a
                                                                perfectly vertical line.     You can also press Shift
                                                                                             to constrain a line to
                                                                                             increments of 45°.


                 4.  With the Line Segment tool still active, click the cursor on the top of the left
                    flake branch in the template image; while holding down the mouse button,
                    drag down and right until you see the word “path” appear near the cursor,
                    then release the mouse button.
                    The word “path” is another function of Illustrator’s Smart Guides; when you drag near
                    an existing path, Illustrator identifies the path so you can place a point exactly on top of
                    the existing path.

                                  Click here and hold down
                                     the mouse button…

                                  …drag to here, and then
                                  release the mouse button.


                                     The word “path” is a
                                  function of Smart Guides.


           68 Project 1: International Symbols

