


Page 47 - CS6_GD_Look_Inside.pdf
P. 47
19.  In the Layers panel, drag Layer 5 to the top of the layer stack.
                        New layers are automatically placed immediately above the selected layer. You need this
                        new layer to be above the template layers so you can see what you’re drawing.


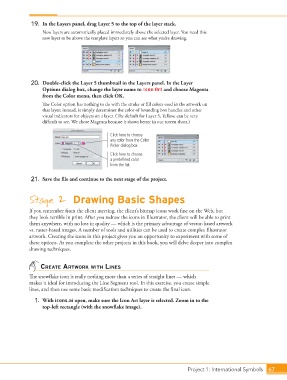
                   20.  Double-click the Layer 5 thumbnail in the Layers panel. In the Layer
                        Options dialog box, change the layer name to Icon Art and choose Magenta
                        from the Color menu, then click OK.
                        The Color option has nothing to do with the stroke or fill colors used in the artwork on
                        that layer; instead, it simply determines the color of bounding box handles and other
                        visual indicators for objects on a layer. (The default for Layer 5, Yellow, can be very
                        difficult to see. We chose Magenta because it shows better in our screen shots.)

                                                    Click here to choose
                                                    any color from the Color
                                                    Picker dialog box.
                                                    Click here to choose
                                                    a predefined color
                                                    from the list.

                   21.  Save the file and continue to the next stage of the project.


                  Stage 2  Drawing Basic Shapes

                  If you remember from the client meeting, the client’s bitmap icons work fine on the Web, but
                  they look terrible in print. After you redraw the icons in Illustrator, the client will be able to print
                  them anywhere, with no loss in quality — which is the primary advantage of vector-based artwork
                  vs. raster-based images. A number of tools and utilities can be used to create complex Illustrator
                  artwork. Creating the icons in this project gives you an opportunity to experiment with some of
                  these options. As you complete the other projects in this book, you will delve deeper into complex
                  drawing techniques.


                       create artwork with lines
                  The snowflake icon is really nothing more than a series of straight lines — which
                  makes it ideal for introducing the Line Segment tool. In this exercise, you create simple
                  lines, and then use some basic modification techniques to create the final icon.

                    1.  With icons.ai open, make sure the Icon Art layer is selected. Zoom in to the
                        top-left rectangle (with the snowflake image).


                                                                                   Project 1: International Symbols  67

