


Page 43 - CS6_GD_Look_Inside.pdf
P. 43
Manage MultiPle layers
                  When you create artwork in Illustrator, you almost always end up with more than
                  one object on the artboard. In many cases, a completed file has dozens or hundreds
                  of objects, arranged in specific order on top of one another. As files become more and
                  more complex, it can be difficult to find and work with exactly the pieces you need.
                  Illustrator layers are one of the most powerful tools available for solving this problem.

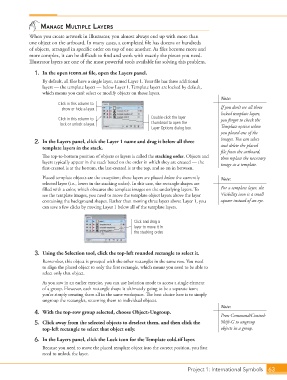
                    1.  In the open icons.ai file, open the Layers panel.
                        By default, all files have a single layer, named Layer 1. Your file has three additional
                        layers — the template layers — below Layer 1. Template layers are locked by default,
                        which means you can’t select or modify objects on those layers.
                                                                                                 Note:
                              Click in this column to
                                show or hide a layer.                                            If you don’t see all three
                                                                                                 locked template layers,
                              Click in this column to               Double-click the layer       you forgot to check the
                               lock or unlock a layer.              thumbnail to open the        Template option when
                                                                    Layer Options dialog box.
                                                                                                 you placed one of the
                                                                                                 images. You can select
                    2.  In the Layers panel, click the Layer 1 name and drag it below all three   and delete the placed
                        template layers in the stack.
                                                                                                 file from the artboard,
                        The top-to-bottom position of objects or layers is called the stacking order. Objects and   then replace the necessary
                        layers typically appear in the stack based on the order in which they are created — the   image as a template.
                        first-created is at the bottom, the last-created is at the top, and so on in between.
                        Placed template objects are the exception; these layers are placed below the currently   Note:
                        selected layer (i.e., lower in the stacking order). In this case, the rectangle shapes are
                        filled with a color, which obscures the template images on the underlying layers. To   For a template layer, the
                        see the template images, you need to move the template object layers above the layer   Visibility icon is a small
                        containing the background shapes. Rather than moving three layers above Layer 1, you   square instead of an eye.
                        can save a few clicks by moving Layer 1 below all of the template layers.

                                                             Click and drag a
                                                             layer to move it in
                                                             the stacking order.


                    3.  Using the Selection tool, click the top-left rounded rectangle to select it.
                        Remember, this object is grouped with the other rectangles in the same row. You need
                        to align the placed object to only the first rectangle, which means you need to be able to
                        select only that object.

                        As you saw in an earlier exercise, you can use Isolation mode to access a single element
                        of a group. However, each rectangle shape is ultimately going to be a separate icon;
                        you’re simply creating them all in the same workspace. The best choice here is to simply
                        ungroup the rectangles, returning them to individual objects.
                                                                                                 Note:
                    4.  With the top-row group selected, choose Object>Ungroup.
                                                                                                 Press Command/Control-
                    5.  Click away from the selected objects to deselect them, and then click the   Shift-G to ungroup
                        top-left rectangle to select that object only.                           objects in a group.
                    6.  In the Layers panel, click the Lock icon for the Template cold.tif layer.

                        Because you need to move the placed template object into the correct position, you first
                        need to unlock the layer.


                                                                                   Project 1: International Symbols  63

