
Page 77 - Demo
P. 77
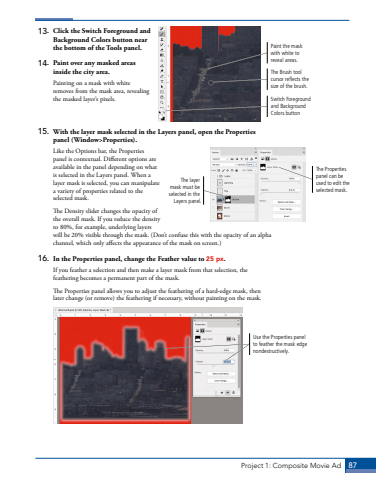
Project 1: Composite Movie Ad 8713. Click the Switch Foreground and Background Colors button near the bottom of the Tools panel.14. Paint over any masked areas inside the city area.Painting on a mask with white removes from the mask area, revealing the masked layer%u2019s pixels. 15. With the layer mask selected in the Layers panel, open the Properties panel (Window>Properties). Like the Options bar, the Properties panel is contextual. Different options are available in the panel depending on what is selected in the Layers panel. When a layer mask is selected, you can manipulate a variety of properties related to the selected mask.The Density slider changes the opacity of the overall mask. If you reduce the density to 80%, for example, underlying layers will be 20% visible through the mask. (Don%u2019t confuse this with the opacity of an alpha channel, which only affects the appearance of the mask on screen.)16. In the Properties panel, change the Feather value to 25 px.If you feather a selection and then make a layer mask from that selection, the feathering becomes a permanent part of the mask.The Properties panel allows you to adjust the feathering of a hard-edge mask, then later change (or remove) the feathering if necessary, without painting on the mask.Use the Properties panel to feather the mask edge nondestructively.Paint the mask with white to reveal areas.The Brush tool cursor reflects the size of the brush.Switch Foreground and Background Colors buttonThe Properties panel can be used to edit the selected mask.The layer mask must be selected in the Layers panel.
