
Page 79 - Demo
P. 79
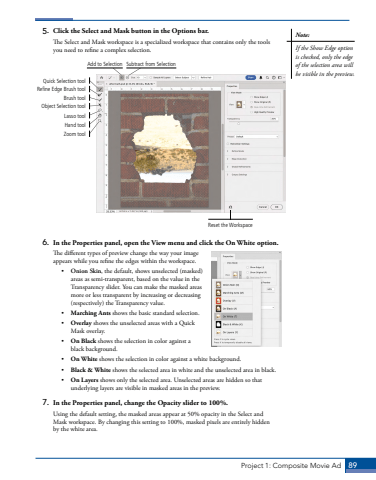
Project 1: Composite Movie Ad 895. Click the Select and Mask button in the Options bar.The Select and Mask workspace is a specialized workspace that contains only the tools you need to refine a complex selection. Quick Selection toolRefine Edge Brush toolBrush toolLasso toolObject Selection toolHand toolZoom toolAdd to SelectionReset the WorkspaceSubtract from Selection6. In the Properties panel, open the View menu and click the On White option.The different types of preview change the way your image appears while you refine the edges within the workspace.%u2022 Onion Skin, the default, shows unselected (masked) areas as semi-transparent, based on the value in the Transparency slider. You can make the masked areas more or less transparent by increasing or decreasing (respectively) the Transparency value.%u2022 Marching Ants shows the basic standard selection.%u2022 Overlay shows the unselected areas with a Quick Mask overlay.%u2022 On Black shows the selection in color against a black background.%u2022 On White shows the selection in color against a white background.%u2022 Black & White shows the selected area in white and the unselected area in black.%u2022 On Layers shows only the selected area. Unselected areas are hidden so that underlying layers are visible in masked areas in the preview.7. In the Properties panel, change the Opacity slider to 100%.Using the default setting, the masked areas appear at 50% opacity in the Select and Mask workspace. By changing this setting to 100%, masked pixels are entirely hidden by the white area.Note:If the Show Edge option is checked, only the edge of the selection area will be visible in the preview.
