


Page 64 - CS6_PS_Look_Inside
P. 64
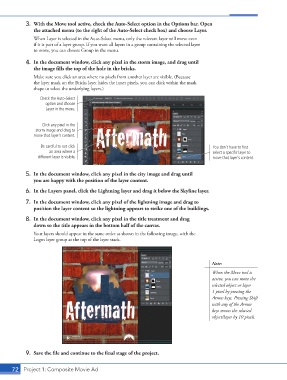
3.  With the Move tool active, check the Auto-Select option in the Options bar. Open
                    the attached menu (to the right of the Auto-Select check box) and choose Layer.
                    When Layer is selected in the Auto-Select menu, only the relevant layer will move even
                    if it is part of a layer group. If you want all layers in a group containing the selected layer
                    to move, you can choose Group in the menu.
                 4.  In the document window, click any pixel in the storm image, and drag until
                    the image fills the top of the hole in the bricks.
                    Make sure you click an area where no pixels from another layer are visible. (Because
                    the layer mask on the Bricks layer hides the inner pixels, you can click within the mask
                    shape to select the underlying layers.)

                       Check the Auto-Select
                         option and choose
                         Layer in the menu.


                        Click any pixel in the
                     storm image and drag to
                    move that layer’s content.

                       Be careful to not click                                                You don’t have to first
                           an area where a                                                    select a specific layer to
                      different layer is visible.                                             move that layer’s content.


                 5.  In the document window, click any pixel in the city image and drag until
                    you are happy with the position of the layer content.
                 6.  In the Layers panel, click the Lightning layer and drag it below the Skyline layer.

                 7.  In the document window, click any pixel of the lightning image and drag to
                    position the layer content so the lightning appears to strike one of the buildings.
                 8.  In the document window, click any pixel in the title treatment and drag
                    down so the title appears in the bottom half of the canvas.
                    Your layers should appear in the same order as shown in the following image, with the
                    Logos layer group at the top of the layer stack.


                                                                                             Note:
                                                                                             When the Move tool is
                                                                                             active, you can move the
                                                                                             selected object or layer
                                                                                             1 pixel by pressing the
                                                                                             Arrow keys. Pressing Shift
                                                                                             with any of the Arrow
                                                                                             keys moves the selected
                                                                                             object/layer by 10 pixels.


                 9.  Save the file and continue to the final stage of the project.


           72 Project 1: Composite Movie Ad

