


Page 63 - CS6_PS_Look_Inside
P. 63
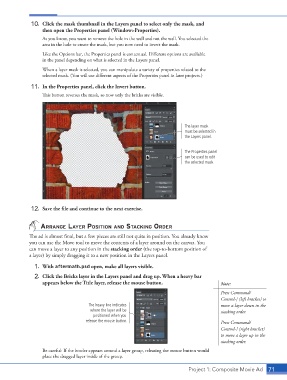
10.  Click the mask thumbnail in the Layers panel to select only the mask, and
                        then open the Properties panel (Window>Properties).
                        As you know, you want to remove the hole in the wall and not the wall. You selected the
                        area in the hole to create the mask, but you now need to invert the mask.
                        Like the Options bar, the Properties panel is contextual. Different options are available
                        in the panel depending on what is selected in the Layers panel.
                        When a layer mask is selected, you can manipulate a variety of properties related to the
                        selected mask. (You will use different aspects of the Properties panel in later projects.)

                   11.  In the Properties panel, click the Invert button.
                        This button reverses the mask, so now only the bricks are visible.


                                                                                  The layer mask
                                                                                  must be selected in
                                                                                  the Layers panel.


                                                                                  The Properties panel
                                                                                  can be used to edit
                                                                                  the selected mask.


                   12.  Save the file and continue to the next exercise.


                       ArrAnge lAyer position And stAcking order
                  The ad is almost final, but a few pieces are still not quite in position. You already know
                  you can use the Move tool to move the contents of a layer around on the canvas. You
                  can move a layer to any position in the stacking order (the top-to-bottom position of
                  a layer) by simply dragging it to a new position in the Layers panel.

                    1.  With aftermath.psd open, make all layers visible.
                    2.  Click the Bricks layer in the Layers panel and drag up. When a heavy bar
                        appears below the Title layer, release the mouse button.                 Note:
                                                                                                 Press Command/
                                                                                                 Control-[ (left bracket) to
                                           The heavy line indicates                              move a layer down in the
                                           where the layer will be                               stacking order.
                                             positioned when you
                                          release the mouse button.                              Press Command/
                                                                                                 Control-] (right bracket)
                                                                                                 to move a layer up in the
                                                                                                 stacking order.
                        Be careful: If the border appears around a layer group, releasing the mouse button would
                        place the dragged layer inside of the group.

                                                                                    Project 1: Composite Movie Ad   71

