


Page 62 - CS6_PS_Look_Inside
P. 62
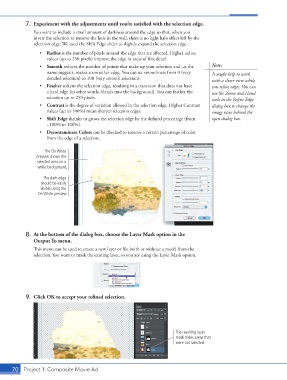
7.  Experiment with the adjustments until you’re satisfied with the selection edge.
                    You want to include a small amount of darkness around the edge so that, when you
                    invert the selection to remove the hole in the wall, there is no light halo effect left by the
                    selection edge. We used the Shift Edge slider to slightly expand the selection edge.
                       •  Radius is the number of pixels around the edge that are affected. Higher radius
                          values (up to 250 pixels) improve the edge in areas of fine detail.
                       •  Smooth reduces the number of points that make up your selection and, as the   Note:
                          name suggests, makes a smoother edge. You can set smoothness from 0 (very   It might help to work
                          detailed selection) to 100 (very smooth selection).                with a closer view while
                       •  Feather softens the selection edge, resulting in a transition that does not have   you refine edges. You can
                          a hard edge (in other words, blends into the background). You can feather the   use the Zoom and Hand
                          selection up to 250 pixels.                                        tools in the Refine Edge
                       •  Contrast is the degree of variation allowed in the selection edge. Higher Contrast   dialog box to change the
                          values (up to 100%) mean sharper selection edges.                  image view behind the
                       •  Shift Edge shrinks or grows the selection edge by the defined percentage (from   open dialog box.
                          –100% to 100%).
                       •  Decontaminate Colors can be checked to remove a certain percentage of color
                          from the edge of a selection.

                         The On White
                     preview shows the
                      selected area on a
                      white background.

                        The dark edge
                       should be easily
                       visible using the
                      On White preview.


                 8.  At the bottom of the dialog box, choose the Layer Mask option in the
                    Output To menu.
                    This menu can be used to create a new layer or file (with or without a mask) from the
                    selection. You want to mask the existing layer, so you are using the Layer Mask option.


                 9.  Click OK to accept your refined selection.


                                                                              The resulting layer
                                                                              mask hides areas that
                                                                              were not selected.


           70 Project 1: Composite Movie Ad

