


Page 39 - CS6_ID_Look_Inside
P. 39
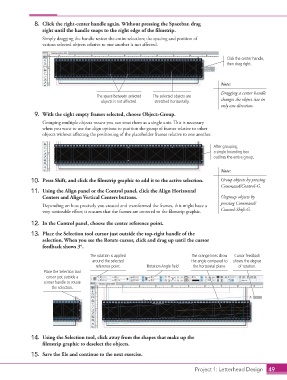
8.  Click the right-center handle again. Without pressing the Spacebar, drag
                        right until the handle snaps to the right edge of the filmstrip.
                        Simply dragging the handle resizes the entire selection; the spacing and position of
                        various selected objects relative to one another is not affected.


                                                                                                   Click the center handle,
                                                                                                   then drag right.


                                                                                                 Note:
                                                                                                 Dragging a center handle
                                              The space between selected   The selected objects are
                                                objects is not affected.  stretched horizontally.  changes the object size in
                                                                                                 only one direction.
                    9.  With the eight empty frames selected, choose Object>Group.
                        Grouping multiple objects means you can treat them as a single unit. This is necessary
                        when you want to use the align options to position the group of frames relative to other
                        objects without affecting the positioning of the placeholder frames relative to one another.

                                                                                              After grouping,
                                                                                              a single bounding box
                                                                                              outlines the entire group.

                                                                                                 Note:

                   10.  Press Shift, and click the filmstrip graphic to add it to the active selection.  Group objects by pressing
                                                                                                 Command/Control-G.
                   11.  Using the Align panel or the Control panel, click the Align Horizontal
                        Centers and Align Vertical Centers buttons.                              Ungroup objects by
                                                                                                 pressing Command/
                        Depending on how precisely you created and transformed the frames, this might have a
                        very noticeable effect; it ensures that the frames are centered to the filmstrip graphic.  Control-Shift-G.

                   12.  In the Control panel, choose the center reference point.
                   13.  Place the Selection tool cursor just outside the top-right handle of the
                        selection. When you see the Rotate cursor, click and drag up until the cursor
                        feedback shows 3°.
                                           The rotation is applied                   The orange lines show   Cursor feedback
                                            around the selected                      the angle compared to   shows the degree
                                              reference point.     Rotation Angle field  the horizontal plane.  of rotation.
                        Place the Selection tool
                         cursor just outside a
                        corner handle to rotate
                            the selection.


                                                                 Text
                                                                 Here


                   14.  Using the Selection tool, click away from the shapes that make up the
                        filmstrip graphic to deselect the objects.

                   15.  Save the file and continue to the next exercise.


                                                                                      Project 1: Letterhead Design  49

