
Page 69 - CC 2019 ID Look Inside
P. 69
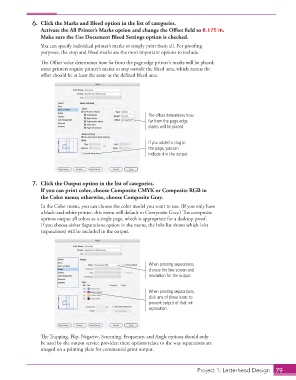
6.  Click the  Marks and Bleed option in the list of categories.
                      Activate the  All  Printer’s Marks option and change the Off set fi eld to 0.125 in.
                      Make sure the Use  Document Bleed Settings option is checked.

                      You can specify individual printer’s marks or simply print them all. For proofi ng
                      purposes, the crop and bleed marks are the most important options to include.

                      Th  e Off set value determines how far from the page edge printer’s marks will be placed;
                      some printers require printer’s marks to stay outside the bleed area, which means the
                      off set should be at least the same as the defi ned bleed area.


                                                               The offset determines how
                                                               far from the page edge
                                                               marks will be placed.


                                                               If you added a slug to
                                                               the page, you can
                                                               include it in the output.


                  7.  Click the Output option in the list of categories.
                      If you can print color, choose  Composite CMYK or Composite RGB in
                      the Color menu; otherwise, choose Composite Gray.
                      In the Color menu, you can choose the color model you want to use. (If you only have
                      a black-and-white printer, this menu will default to Composite Gray.) Th  e composite
                      options output all colors to a single page, which is appropriate for a desktop proof.
                      If you choose either  Separations option in the menu, the Inks list shows which inks
                      (separations) will be included in the output.


                                                               When printing separations,
                                                               choose the line screen and
                                                               resolution for the output.


                                                               When printing separations,
                                                               click any of these icons to
                                                               prevent output of that ink
                                                               separation.


                      Th  e Trapping, Flip, Negative, Screening, Frequency, and Angle options should only
                      be used by the output service provider; these options relate to the way separations are
                      imaged on a printing plate for commercial print output.


                                                                                    Project 1: Letterhead Design  79