


Page 37 - Adobe Indesign CC 2020
P. 37
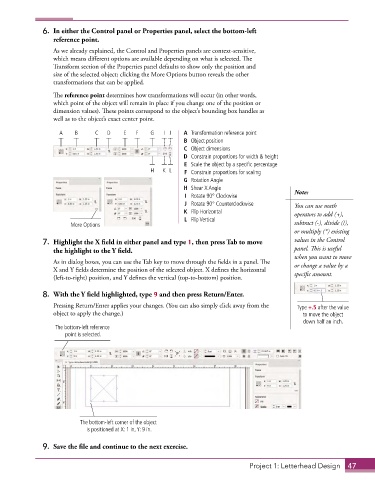
6.  In either the Control panel or Properties panel, select the bottom-left
                 reference point.
                 As we already explained, the Control and Properties panels are context-sensitive,
                 which means different options are available depending on what is selected. The
                 Transform section of the Properties panel defaults to show only the position and
                 size of the selected object; clicking the More Options button reveals the other
                 transformations that can be applied.
                 The reference point determines how transformations will occur (in other words,
                 which point of the object will remain in place if you change one of the position or
                 dimension values). These points correspond to the object’s bounding box handles as
                 well as to the object’s exact center point.

                   A    B     C   D    E   F   G   I J    A  Transformation reference point
                                                          B  Object position
                                                          C  Object dimensions
                                                          D  Constrain proportions for width & height
                                                          E  Scale the object by a specific percentage
                                               H   K L    F  Constrain proportions for scaling
                                                          G  Rotation Angle
                                                          H  Shear X Angle                 Note:
                                                          I  Rotate 90° Clockwise
                                                          J  Rotate 90° Counterclockwise   You can use math
                                                          K  Flip Horizontal               operators to add (+),
                                                          L  Flip Vertical
                       More Options                                                        subtract (-), divide (/),
                                                                                           or multiply (*) existing
              7.  Highlight the X field in either panel and type 1, then press Tab to move   values in the Control
                 the highlight to the Y field.                                             panel. This is useful
                                                                                           when you want to move
                 As in dialog boxes, you can use the Tab key to move through the fields in a panel. The   or change a value by a
                 X and Y fields determine the position of the selected object. X defines the horizontal
                 (left-to-right) position, and Y defines the vertical (top-to-bottom) position.  specific amount.

              8.  With the Y field highlighted, type 9 and then press Return/Enter.
                 Pressing Return/Enter applies your changes. (You can also simply click away from the   Type +.5 after the value
                 object to apply the change.)                                                to move the object
                                                                                              down half an inch.
                  The bottom-left reference
                     point is selected.


                          The bottom-left corner of the object
                           is positioned at X: 1 in, Y: 9 in.

              9.  Save the file and continue to the next exercise.


                                                                             Project 1: Letterhead Design  47

