


Page 42 - Adobe Indesign CC 2020
P. 42
16.  Using the Selection tool, click away from the selected shapes to deselect all
              objects.

          17.  Using the Selection tool, click the right empty graphics frame to select it.
               Because the frames are grouped, clicking once selects the entire group containing the
               frame you clicked.

          18.  In the Control panel, change the Stroke Weight field to 3 pt.

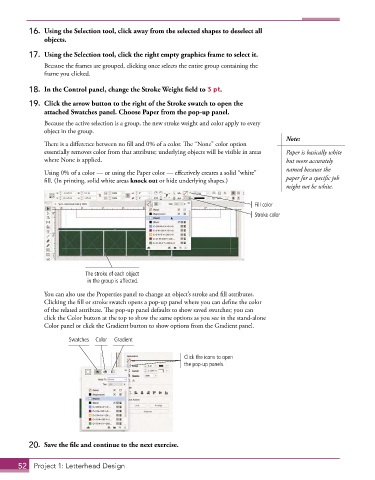
          19.  Click the arrow button to the right of the Stroke swatch to open the
              attached Swatches panel. Choose Paper from the pop-up panel.

               Because the active selection is a group, the new stroke weight and color apply to every
               object in the group.
                                                                                        Note:
               There is a difference between no fill and 0% of a color. The “None” color option
               essentially removes color from that attribute; underlying objects will be visible in areas   Paper is basically white
               where None is applied.                                                   but more accurately
                                                                                        named because the
               Using 0% of a color — or using the Paper color — effectively creates a solid “white”
               fill. (In printing, solid white areas knock out or hide underlying shapes.)   paper for a specific job
                                                                                        might not be white.

                                                                               Fill color
                                                                               Stroke color


                           The stroke of each object
                            in the group is affected.
               You can also use the Properties panel to change an object’s stroke and fill attributes.
               Clicking the fill or stroke swatch opens a pop-up panel where you can define the color
               of the related attribute. The pop-up panel defaults to show saved swatches; you can
               click the Color button at the top to show the same options as you see in the stand-alone
               Color panel or click the Gradient button to show options from the Gradient panel.

                      Swatches  Color  Gradient

                                                         Click the icons to open
                                                         the pop-up panels.


          20.  Save the file and continue to the next exercise.


       52  Project 1: Letterhead Design

