


Page 28 - CS6_WD_Look_Inside
P. 28
The Crop Tools in Depth (continued)

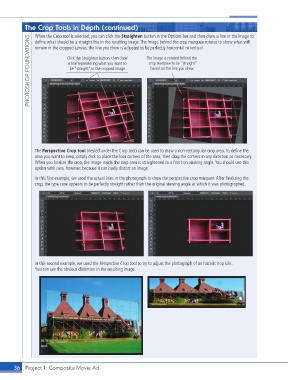
                    When the Crop tool is selected, you can click the Straighten button in the Options bar and then draw a line in the image to
                  PHOTOSHOP FOUNDATIONS  Click the Straighten button, then draw   The image is rotated behind the
                    define what should be a straight line in the resulting image. The image behind the crop marquee rotates to show what will
                    remain in the cropped canvas; the line you drew is adjusted to be perfectly horizontal or vertical.

                                                                   crop marquee to be “straight”
                                  a line representing what you want to
                                  be “straight” in the cropped image.
                                                                    based on the line you drew.


                    The Perspective Crop tool (nested under the Crop tool) can be used to draw a non-rectangular crop area. To define the
                    area you want to keep, simply click to place the four corners of the area, then drag the corners in any direction as necessary.
                    When you finalize the crop, the image inside the crop area is straightened to a front-on viewing angle. You should use this
                    option with care, however, because it can badly distort an image.
                    In this first example, we used the actual lines in the photograph to draw the perspective crop marquee. After finalizing the
                    crop, the type case appears to be perfectly straight rather than the original viewing angle at which it was photographed.


                    In this second example, we used the Perspective Crop tool to try to adjust the photograph of an historic hop kiln.
                    You can see the obvious distortion in the resulting image.


           36 Project 1: Composite Movie Ad

