


Page 25 - CS6_WD_Look_Inside
P. 25
CroP the Canvas and PLaCe ruLer guIdes
                  The final step in preparing the workspace is defining the live area of the page. Trim
                  size is the actual size of a page once it has been cut out of the press sheet. According to   Note:
                  your client, the magazine has a trim size of 8.5″ 1 11″.                       You should familiarize
                      Any elements that print right to the edge of a page (called bleeding) must actually   yourself with the most
                  extend beyond the defined trim size. The bleed allowance is the amount of extra space   common fraction-to-
                  that should be included for these bleed objects; most applications require at least 1/8″   decimal equivalents:
                  bleed allowance on any bleed edge.
                                                                                                   1/8 = 0.125
                      Because of inherent variation in the mechanical printing and trimming processes,
                  most magazines also define a safe or live area; all important design elements (especially   1/4 = 0.25
                  text) should stay within this live area. The live area for this project is 8 1 10.5″.  3/8 = 0.375
                                                                                                   1/2 = 0.5
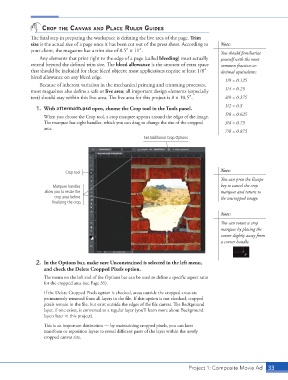
                    1.  With aftermath.psd open, choose the Crop tool in the Tools panel.
                                                                                                   5/8 = 0.625
                        When you choose the Crop tool, a crop marquee appears around the edges of the image.
                        The marquee has eight handles, which you can drag to change the size of the cropped   3/4 = 0.75
                        area.
                                                                                                   7/8 = 0.875
                                                                 Set Additional Crop Options


                                 Crop tool                                                       Note:
                                                                                                 You can press the Escape
                            Marquee handles                                                      key to cancel the crop
                        allow you to resize the                                                  marquee and return to
                            crop area before                                                     the uncropped image.
                           finalizing the crop.

                                                                                                 Note:

                                                                                                 You can rotate a crop
                                                                                                 marquee by placing the
                                                                                                 cursor slightly away from
                                                                                                 a corner handle.


                    2.  In the Options bar, make sure Unconstrained is selected in the left menu,
                        and check the Delete Cropped Pixels option.
                        The menu on the left end of the Options bar can be used to define a specific aspect ratio
                        for the cropped area (see Page 35).

                        If the Delete Cropped Pixels option is checked, areas outside the cropped areas are
                        permanently removed from all layers in the file. If this option is not checked, cropped
                        pixels remain in the file, but exist outside the edges of the file canvas. The Background
                        layer, if one exists, is converted to a regular layer (you’ll learn more about Background
                        layers later in this project).
                        This is an important distinction — by maintaining cropped pixels, you can later
                        transform or reposition layers to reveal different parts of the layer within the newly
                        cropped canvas size.


                                                                                    Project 1: Composite Movie Ad   33

