


Page 33 - CS6_WD_Look_Inside
P. 33
7.  Click the Close button on the storm.jpg document tab to close that file.
                        After closing the storm file, the aftermath.psd document window expands to fill the
                        available space.

                        If you remember from the Bridge metadata, the storm image was 17.1″ 1 11.4″ at
                        180 ppi. Photoshop cannot maintain multiple resolutions in a single file. When you
                        move the image content into the aftermath file, it adopts the resolution of the target file
                        (in this case, 300 ppi). The concept of effective resolution transforms the storm image/
                        layer to approximately 10.25″ 1 6.825″ at 300 ppi.

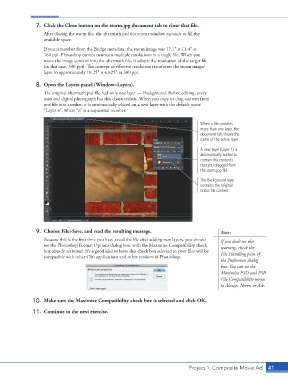
                    8.  Open the Layers panel (Window>Layers).
                        The original aftermath.psd file had only one layer — Background. Before editing, every
                        scan and digital photograph has this characteristic. When you copy or drag content from
                        one file into another, it is automatically placed on a new layer with the default name
                        “Layer n”, where “n” is a sequential number.

                                                                                        When a file contains
                                                                                        more than one layer, the
                                                                                        document tab shows the
                                                                                        name of the active layer.

                                                                                        A new layer (Layer 1) is
                                                                                        automatically added to
                                                                                        contain the contents
                                                                                        that you dragged from
                                                                                        the storm.jpg file.

                                                                                        The Background layer
                                                                                        contains the original
                                                                                        bricks file content.


                    9.  Choose File>Save, and read the resulting message.                        Note:
                        Because this is the first time you have saved the file after adding new layers, you should   If you don’t see this
                        see the Photoshop Format Options dialog box, with the Maximize Compatibility check   warning, check the
                        box already activated. It’s a good idea to leave this check box selected so your files will be   File Handling pane of
                        compatible with other CS6 applications and other versions of Photoshop.
                                                                                                 the Preferences dialog
                                                                                                 box. You can set the
                                                                                                 Maximize PSD and PSB
                                                                                                 File Compatibility menu
                                                                                                 to Always, Never, or Ask.


                   10.  Make sure the Maximize Compatibility check box is selected and click OK.
                   11.  Continue to the next exercise.


                                                                                    Project 1: Composite Movie Ad   41

