


Page 72 - CC 2019 WD Look Inside
P. 72
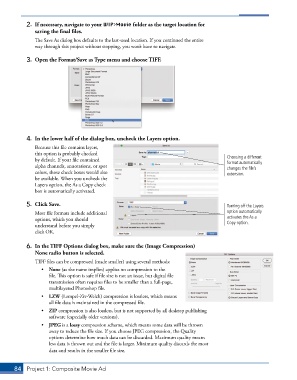
2.  If necessary, navigate to your WIP>Movie folder as the target location for
               saving the final files.
               The Save As dialog box defaults to the last-used location. If you continued the entire
               way through this project without stopping, you won’t have to navigate.


           3.  Open the Format/Save as Type menu and choose TIFF.


           4.  In the lower half of the dialog box, uncheck the Layers option.

               Because this file contains layers,
               this option is probably checked
               by default. If your file contained                                        Choosing a different
                                                                                         format automatically
               alpha channels, annotations, or spot                                      changes the file’s
               colors, those check boxes would also                                      extension.
               be available. When you uncheck the
               Layers option, the As a Copy check
               box is automatically activated.

           5.  Click Save.                                                               Turning off the Layers
               Most file formats include additional                                      option automatically
               options, which you should                                                 activates the As a
               understand before you simply                                              Copy option.
               click OK.

           6.  In the TIFF Options dialog box, make sure the (Image Compression)
              None radio button is selected.
               TIFF files can be compressed (made smaller) using several methods:
                 •  None (as the name implies) applies no compression to the
                    file. This option is safe if file size is not an issue, but digital file
                    transmission often requires files to be smaller than a full-page,
                    multilayered Photoshop file.
                 •  LZW (Lempel-Ziv-Welch) compression is lossless, which means
                    all file data is maintained in the compressed file.
                 •  ZIP compression is also lossless, but is not supported by all desktop publishing
                    software (especially older versions).
                 •  JPEG is a lossy compression scheme, which means some data will be thrown
                    away to reduce the file size. If you choose JPEG compression, the Quality
                    options determine how much data can be discarded. Maximum quality means
                    less data is thrown out and the file is larger. Minimum quality discards the most
                    data and results in the smaller file size.


       84  Project 1: Composite Movie Ad

