


Page 69 - CC 2019 WD Look Inside
P. 69
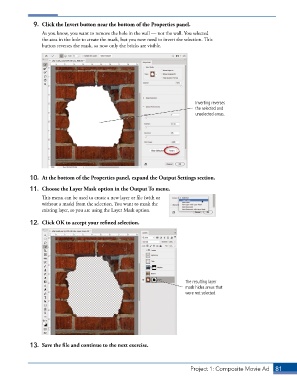
9.  Click the Invert button near the bottom of the Properties panel.
                 As you know, you want to remove the hole in the wall — not the wall. You selected
                 the area in the hole to create the mask, but you now need to invert the selection. This
                 button reverses the mask, so now only the bricks are visible.


                                                                            Inverting reverses
                                                                            the selected and
                                                                            unselected areas.


             10.  At the bottom of the Properties panel, expand the Output Settings section.

             11.  Choose the Layer Mask option in the Output To menu.
                 This menu can be used to create a new layer or file (with or
                 without a mask) from the selection. You want to mask the
                 existing layer, so you are using the Layer Mask option.

             12.  Click OK to accept your refined selection.


                                                                        The resulting layer
                                                                        mask hides areas that
                                                                        were not selected.


             13.  Save the file and continue to the next exercise.


                                                                          Project 1: Composite Movie Ad    81

