


Page 56 - CC 2019 WD Look Inside
P. 56
4.  Choose Select>Deselect to turn off the current selection.
                                                                                        Note:
               Although you could keep adding to the selection with the Magic Wand tool, the
               marching ants can’t really show the fine detail.                         Press Command/
                                                                                        Control-D to deselect
           5.  Choose Select>Color Range.                                               the active selection.

           6.  Make sure the Localized Color Clusters option is unchecked.

           7.  In the Selection Preview menu, choose White Matte (if it is not already   Note:
              selected).
               By changing the Selection Preview, you can more easily determine exactly what is   Because the dialog box
               selected. You can preview color range selections in the image window as:   preview is so small, we
                 •  None shows the normal image in the document window.                prefer to rely on the
                                                                                       preview in the docu-
                 •  Grayscale shows the entire image in shades of gray. Selected areas are solid
                    white and unselected areas are solid black.                        ment window, which is
                                                                                       controlled in the Selec-
                 •  Black Matte shows unselected areas in solid black. Selected areas appear in   tion Preview menu at
                    color.
                                                                                       the bottom of the dialog
                 •  White Matte shows unselected areas in solid white. Selected areas appear in   box.
                    color.
                 •  Quick Mask adds a partially transparent overlay to unselected areas.

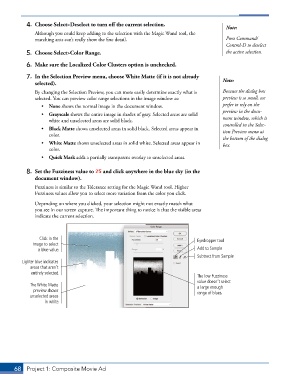
           8.  Set the Fuzziness value to 25 and click anywhere in the blue sky (in the
               document window).
               Fuzziness is similar to the Tolerance setting for the Magic Wand tool. Higher
               Fuzziness values allow you to select more variation from the color you click.
               Depending on where you clicked, your selection might not exactly match what
               you see in our screen capture. The important thing to notice is that the visible areas
               indicate the current selection.


                Click in the                                                 Eyedropper tool
              image to select
                a blue value.                                                Add to Sample
                                                                             Subtract from Sample
          Lighter blue indicates
             areas that aren’t
             entirely selected.
                                                                             The low Fuzziness
                                                                             value doesn’t select
             The White Matte                                                 a large enough
              preview shows                                                  range of blues.
             unselected areas
                  in white.


       68  Project 1: Composite Movie Ad

