


Page 51 - CC 2019 WD Look Inside
P. 51
3.  Close the Lightning.jpg file.                                            Note:
                 Your goal in this exercise is to create a transparent area around the actual lightning bolt.
                                                                                           If the original placed file
                 Flat files (including JPEG) do not support transparency. To save the file with   was a native Photoshop
                 transparency, you should save it as a native Photoshop file with the PSD extension.   file, you would not need
                 However, as the warning message indicated, you must save the Smart Object file with   to rasterize the Smart
                 the same name — which includes the file extension.
                                                                                           Object layer to accom-
                 Because you can’t save transparency in a JPEG file, you need to break the link to the   plish your goal.
                 original JPEG file before you can create that transparency in the composite file.

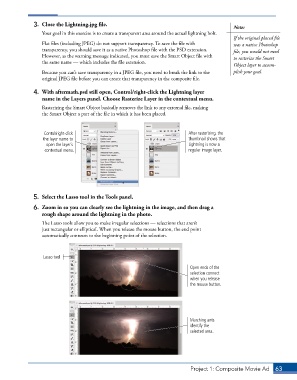
              4.  With aftermath.psd still open, Control/right-click the Lightning layer
                 name in the Layers panel. Choose Rasterize Layer in the contextual menu.
                 Rasterizing the Smart Object basically removes the link to any external file, making
                 the Smart Object a part of the file in which it has been placed.


                  Contol/right-click                                      After rasterizing, the
                  the layer name to                                       thumbnail shows that
                   open the layer’s                                       Lightning is now a
                  contextual menu.                                        regular image layer.


              5.  Select the Lasso tool in the Tools panel.

              6.  Zoom in so you can clearly see the lightning in the image, and then drag a
                 rough shape around the lightning in the photo.
                 The Lasso tools allow you to make irregular selections — selections that aren’t
                 just rectangular or elliptical. When you release the mouse button, the end point
                 automatically connects to the beginning point of the selection.


                  Lasso tool

                                                                          Open ends of the
                                                                          selection connect
                                                                          when you release
                                                                          the mouse button.


                                                                          Marching ants
                                                                          identify the
                                                                          selected area.


                                                                          Project 1: Composite Movie Ad    63

