


Page 53 - CC 2019 WD Look Inside
P. 53
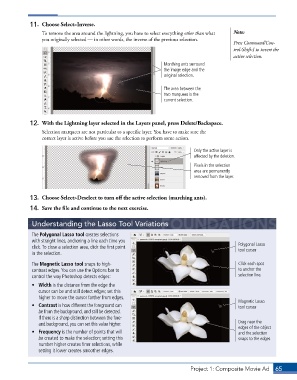
11.  Choose Select>Inverse.
                 To remove the area around the lightning, you have to select everything other than what   Note:
                 you originally selected — in other words, the inverse of the previous selection.
                                                                                           Press Command/Con-
                                                                                           trol-Shift-I to invert the
                                                                                           active selection.
                                                                Marching ants surround
                                                                the image edge and the
                                                                original selection.

                                                                The area between the
                                                                two marquees is the
                                                                current selection.


             12.  With the Lightning layer selected in the Layers panel, press Delete/Backspace.
                 Selection marquees are not particular to a specific layer. You have to make sure the
                 correct layer is active before you use the selection to perform some action.


                                                                            Only the active layer is
                                                                            affected by the deletion.
                                                                            Pixels in the selection
                                                                            area are permanently
                                                                            removed from the layer.


             13.  Choose Select>Deselect to turn off the active selection (marching ants).
             14.  Save the file and continue to the next exercise.


             Understanding the Lasso Tool Variations

             The Polygonal Lasso tool creates selections
             with straight lines, anchoring a line each time you
             click. To close a selection area, click the first point                         Polygonal Lasso
                                                                                             tool cursor
             in the selection.
             The Magnetic Lasso tool snaps to high-                                          Click each spot
             contrast edges. You can use the Options bar to                                  to anchor the
             control the way Photoshop detects edges:                                        selection line.
             •  Width is the distance from the edge the
                cursor can be and still detect edges; set this
                higher to move the cursor farther from edges.
                                                                                             Magnetic Lasso
             •  Contrast is how different the foreground can                                 tool cursor
                be from the background, and still be detected.
                If there is a sharp distinction between the fore-
                and background, you can set this value higher.                               Drag near the
                                                                                             edges of the object
             •  Frequency is the number of points that will                                  and the selection
                be created to make the selection; setting this                               snaps to the edges.
                number higher creates finer selections, while
                setting it lower creates smoother edges.


                                                                          Project 1: Composite Movie Ad    65

