


Page 54 - CC 2019 WD Look Inside
P. 54
Understanding Channels

           You need a bit of background about channels to understand what’s happening in the Quick Mask you will use in the next
           exercise. (You will use channels extensively in later projects.)
           Every image has one channel for each component color. Each channel
           contains the information for the amount of that component color in
           any given pixel. An RGB image has three channels: Red, Green, and Blue
           (top right). A CMYK image has four channels: Cyan, Magenta, Yellow, and
           Black (bottom right).

           In RGB images, the three additive primaries can have a value of 0 (none of
           that color) to 255 (full intensity of that color). Combining a value of 255 for
           each primary results in white. A value of 0 for each primary results in black.
           In CMYK images, the three subtractive primaries plus black are combined in
           percentages from 0 (none of that color) to 100 (full intensity of that color) to
           create the range of printable colors. Channels in a CMYK image represent the
           printing plates or separations required to output the job.


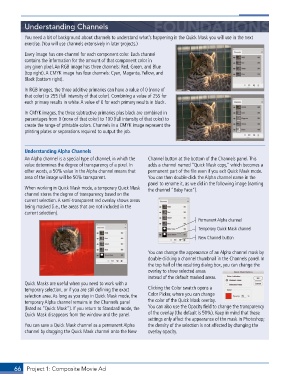
           Understanding Alpha Channels
           An Alpha channel is a special type of channel, in which the   Channel button at the bottom of the Channels panel. This
           value determines the degree of transparency of a pixel. In   adds a channel named “Quick Mask copy,” which becomes a
           other words, a 50% value in the Alpha channel means that   permanent part of the file even if you exit Quick Mask mode.
           area of the image will be 50% transparent.     You can then double-click the Alpha channel name in the
                                                          panel to rename it, as we did in the following image (naming
           When working in Quick Mask mode, a temporary Quick Mask   the channel “Baby Face”).
           channel stores the degree of transparency based on the
           current selection. A semi-transparent red overlay shows areas
           being masked (i.e., the areas that are not included in the
           current selection).
                                                                             Permanent Alpha channel
                                                                             Temporary Quick Mask channel
                                                                             New Channel button


                                                          You can change the appearance of an Alpha channel mask by
                                                          double-clicking a channel thumbnail in the Channels panel. In
                                                          the top half of the resulting dialog box, you can change the
                                                          overlay to show selected areas
                                                          instead of the default masked areas.
           Quick Masks are useful when you need to work with a
           temporary selection, or if you are still defining the exact   Clicking the Color swatch opens a
           selection area. As long as you stay in Quick Mask mode, the   Color Picker, where you can change
           temporary Alpha channel remains in the Channels panel   the color of the Quick Mask overlay.
           (listed as “Quick Mask”). If you return to Standard mode, the   You can also use the Opacity field to change the transparency
           Quick Mask disappears from the window and the panel.  of the overlay (the default is 50%). Keep in mind that these
                                                          settings only affect the appearance of the mask in Photoshop;
           You can save a Quick Mask channel as a permanent Alpha   the density of the selection is not affected by changing the
           channel by dragging the Quick Mask channel onto the New   overlay opacity.


       66  Project 1: Composite Movie Ad

