


Page 37 - CC2019_PS_Look_Inside
P. 37
Place Files as Smart Object Layers

                 As you have seen in the last few exercises, copying layer content from one file to   Note:
                 another results in new regular layers for the pasted content. Photoshop also supports
                 Smart Object layers, in which you place one file into another instead of pasting layer   Smart Objects enable
                 content. Smart Objects provide a number of advantages over regular layers, which   tight integration
                 you will explore later in this project. In this exercise, you will create a Smart Object   between Photoshop and
                 layer for the remaining image element.                                         Illustrator. You can
                                                                                                take advantage of the
                   1.  With cd-artwork.psd open, choose File>Place Embedded.                    sophisticated vector-
                      Two options in the File menu — Place Embedded and Place Linked — give you the   editing features in
                      option to embed the placed file data into the active file, or to place smart objects as   Adobe Illustrator, and
                      links to the original placed file. (See Page 50 for more about placing linked files.)   then place those files
                                                                                                into Photoshop without
                   2.  Choose the Title-text.psd file (in your WIP>Music folder) and click Place.   losing the ability to edit
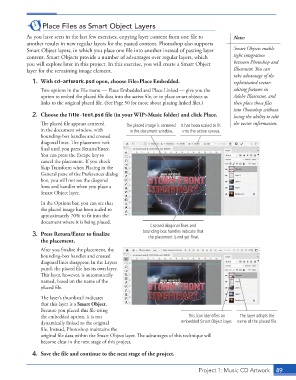
                      The placed file appears centered   The placed image is centered   It has been scaled to fit   the vector information.
                      in the document window, with      in the document window.  into the active canvas.
                      bounding-box handles and crossed
                      diagonal lines. The placement isn’t
                      final until you press Return/Enter.
                      You can press the Escape key to
                      cancel the placement. If you check
                      Skip Transform when Placing in the
                      General pane of the Preferences dialog
                      box, you will not see the diagonal
                      lines and handles when you place a
                      Smart Object layer.
                      In the Options bar, you can see that
                      the placed image has been scaled to
                      approximately 70% to fit into the
                      document where it is being placed.
                                                                Crossed diagonal lines and
                   3.  Press Return/Enter to finalize        bounding-box handles indicate that
                                                               the placement is not yet final.
                      the placement.
                      After you finalize the placement, the
                      bounding-box handles and crossed
                      diagonal lines disappear. In the Layers
                      panel, the placed file has its own layer.
                      This layer, however, is automatically
                      named, based on the name of the
                      placed file.

                      The layer’s thumbnail indicates
                      that this layer is a Smart Object.
                      Because you placed this file using
                      the embedded option, it is not                          This icon identifies an   The layer adopts the
                      dynamically linked to the original                    embedded Smart Object layer.  name of the placed file.
                      file. Instead, Photoshop maintains the
                      original file data within the Smart Object layer. The advantages of this technique will
                      become clear in the next stage of this project.

                   4.  Save the file and continue to the next stage of the project.


                                                                                  Project 1: Music CD Artwork   49

