


Page 30 - CC2018_PS_Look_Inside
P. 30
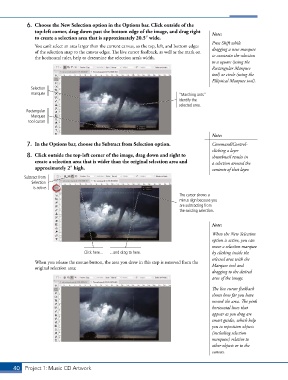
6.  Choose the New Selection option in the Options bar. Click outside of the
               top-left corner, drag down past the bottom edge of the image, and drag right   Note:
               to create a selection area that is approximately 20.5″ wide.
                                                                                        Press Shift while
               You can’t select an area larger than the current canvas, so the top, left, and bottom edges   dragging a new marquee
               of the selection snap to the canvas edges. The live cursor feedback, as well as the mark on
               the horizontal ruler, help to determine the selection area’s width.      to constrain the selection
                                                                                        to a square (using the
                                                                                        Rectangular Marquee
                                                                                        tool) or circle (using the
                                                                                        Elliptical Marquee tool).
              Selection
              marquee                                                      “Marching ants”
                                                                           identify the
                                                                           selected area.
            Rectangular
              Marquee
             tool cursor

                                                                                        Note:
            7.  In the Options bar, choose the Subtract from Selection option.          Command/Control-
                                                                                        clicking a layer
            8.  Click outside the top-left corner of the image, drag down and right to   thumbnail results in
               create a selection area that is wider than the original selection area and   a selection around the
               approximately 2″ high.                                                   contents of that layer.

           Subtract from
              Selection
               is active.
                                                                           The cursor shows a
                                                                           minus sign because you
                                                                           are subtracting from
                                                                           the existing selection.

                                                                                        Note:

                                                                                        When the New Selection
                                                                                        option is active, you can
                                                                                        move a selection marquee
                                    Click here...  ...and drag to here.                 by clicking inside the

                                                                                        selected area with the
               When you release the mouse button, the area you drew in this step is removed from the
               original selection area:                                                 Marquee tool and
                                                                                        dragging to the desired
                                                                                        area of the image.

                                                                                        The live cursor feedback
                                                                                        shows how far you have
                                                                                        moved the area. The pink
                                                                                        horizontal lines that
                                                                                        appear as you drag are
                                                                                        smart guides, which help
                                                                                        you to reposition objects
                                                                                        (including selection
                                                                                        marquees) relative to
                                                                                        other objects or to the
                                                                                        canvas.


       40 Project 1: Music CD Artwork

