


Page 29 - CC2018_PS_Look_Inside
P. 29
copy and pastE sElEctEd pIxEls
              Like many processes in Photoshop — especially one as common as compositing
              multiple images into a single file — there are many different possible methods for
              compositing multiple images into a single file. In this exercise, you will use the most   Note:
              basic selection tool — the Rectangle Marquee tool.                            When you created the
                                                                                            background file for this
                1.  With cd-artwork.psd open, choose View>Fit on Screen to show the entire   project, you created
                   image centered in the document window.                                   a raster image that

                2.  Open the file Tornado.jpg from your WIP>Music folder.                   contains pixels. Digital
                                                                                            photographs and scans
                   If you see a profile mismatch warning when opening the files for this project, choose the   are also pixel-based,
                   option to use the embedded profile. Color management will be explained in Project 3:   which is why you use
                   Museum Image Correction.
                                                                                            Photoshop to edit and
                                                                                            manipulate those types
                3.  With Tornado.jpg the active file in the document window, open the Image   of files.
                   Size dialog box (Image>Image Size).
                   This image is only 150 ppi, but it has a physical size much larger than the defined size for
                   the CD artwork. As with the original image, the principle of effective resolution might
                   make this image usable in the composite ad.

                                                                                            Note:

                                                                                            You can press Command-
                                                                                            Option-I/Control-Alt-I
                                                                                            to open the Image Size
                                                                                            dialog box.


                4.  Click Cancel to close the Image Size dialog box.

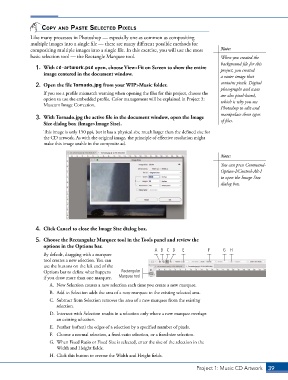
                5.  Choose the Rectangular Marquee tool in the Tools panel and review the
                   options in the Options bar.
                                                                 A B C D    E          F     G  H
                   By default, dragging with a marquee
                   tool creates a new selection. You can
                   use the buttons on the left end of the
                   Options bar to define what happens   Rectangular
                   if you draw more than one marquee.  Marquee tool
                      A.  New Selection creates a new selection each time you create a new marquee.
                      B.  Add to Selection adds the area of a new marquee to the existing selected area.
                      C.  Subtract from Selection removes the area of a new marquee from the existing
                        selection.
                      D.  Intersect with Selection results in a selection only where a new marquee overlaps
                        an existing selection.
                      E.  Feather (soften) the edges of a selection by a specified number of pixels.
                      F.  Choose a normal selection, a fixed-ratio selection, or a fixed-size selection.
                      G.  When Fixed Ratio or Fixed Size is selected, enter the size of the selection in the
                        Width and Height fields.
                      H. Click this button to reverse the Width and Height fields.

                                                                                  Project 1: Music CD Artwork   39

