


Page 56 - CC2017_PS_Look_Inside
P. 56
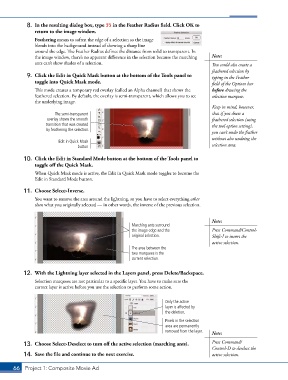
8.  In the resulting dialog box, type 35 in the Feather Radius field. Click OK to
               return to the image window.

               Feathering means to soften the edge of a selection so the image
               blends into the background instead of showing a sharp line
               around the edge. The Feather Radius defines the distance from solid to transparent. In
               the image window, there’s no apparent difference in the selection because the marching   Note:
               ants can’t show shades of a selection.                                   You could also create a
                                                                                        feathered selection by
            9.  Click the Edit in Quick Mask button at the bottom of the Tools panel to   typing in the Feather
               toggle into Quick Mask mode.                                             field of the Options bar
               This mode creates a temporary red overlay (called an Alpha channel) that shows the   before drawing the
               feathered selection. By default, the overlay is semi-transparent, which allows you to see   selection marquee.
               the underlying image.
                                                                                        Keep in mind, however,
                        The semi-transparent                                            that if you draw a
                    overlay shows the smooth                                            feathered selection (using
                    transition that was created                                         the tool option setting),
                    by feathering the selection.
                                                                                        you can’t undo the feather
                                                                                        without also undoing the
                         Edit in Quick Mask
                                 button                                                 selection area.

           10.  Click the Edit in Standard Mode button at the bottom of the Tools panel to
               toggle off the Quick Mask.
               When Quick Mask mode is active, the Edit in Quick Mask mode toggles to become the
               Edit in Standard Mode button.

           11.  Choose Select>Inverse.
               You want to remove the area around the lightning, so you have to select everything other
               than what you originally selected — in other words, the inverse of the previous selection.


                                                                                        Note:
                                                       Marching ants surround
                                                       the image edge and the           Press Command/Control-
                                                       original selection.              Shift-I to invert the
                                                                                        active selection.
                                                       The area between the
                                                       two marquees is the
                                                       current selection.


           12.  With the Lightning layer selected in the Layers panel, press Delete/Backspace.
               Selection marquees are not particular to a specific layer. You have to make sure the
               correct layer is active before you use the selection to perform some action.


                                                                     Only the active
                                                                     layer is affected by
                                                                     the deletion.
                                                                     Pixels in the selection
                                                                     area are permanently
                                                                     removed from the layer.  Note:

           13.  Choose Select>Deselect to turn off the active selection (marching ants).  Press Command/
                                                                                        Control-D to deselect the
           14.  Save the file and continue to the next exercise.                        active selection.


       66 Project 1: Composite Movie Ad

