
Page 69 - Adobe Photoshop CC 2020
P. 69
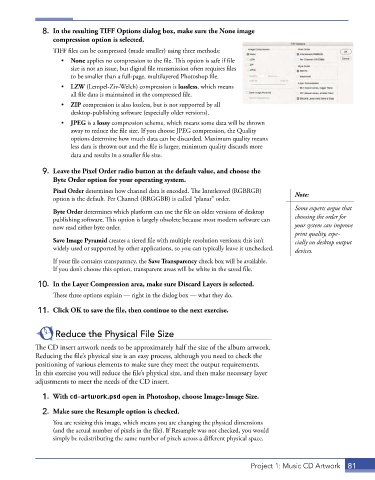
8.  In the resulting TIFF Options dialog box, make sure the None image
                 compression option is selected.
                 TIFF files can be compressed (made smaller) using three methods:
                    •  None applies no compression to the file. This option is safe if file
                       size is not an issue, but digital file transmission often requires files
                       to be smaller than a full-page, multilayered Photoshop file.
                    •  LZW (Lempel-Ziv-Welch) compression is lossless, which means
                       all file data is maintained in the compressed file.
                    •  ZIP compression is also lossless, but is not supported by all
                       desktop-publishing software (especially older versions).
                    •  JPEG is a lossy compression scheme, which means some data will be thrown
                       away to reduce the file size. If you choose JPEG compression, the Quality
                       options determine how much data can be discarded. Maximum quality means
                       less data is thrown out and the file is larger; minimum quality discards more
                       data and results in a smaller file size.

              9.  Leave the Pixel Order radio button at the default value, and choose the
                 Byte Order option for your operating system.

                 Pixel Order determines how channel data is encoded. The Interleaved (RGBRGB)   Note:
                 option is the default. Per Channel (RRGGBB) is called “planar” order.
                                                                                           Some experts argue that
                 Byte Order determines which platform can use the file on older versions of desktop
                 publishing software. This option is largely obsolete because most modern software can   choosing the order for
                 now read either byte order.                                               your system can improve
                                                                                           print quality, espe-
                 Save Image Pyramid creates a tiered file with multiple resolution versions; this isn’t   cially on desktop output
                 widely used or supported by other applications, so you can typically leave it unchecked.   devices.

                 If your file contains transparency, the Save Transparency check box will be available.
                 If you don’t choose this option, transparent areas will be white in the saved file.

             10.  In the Layer Compression area, make sure Discard Layers is selected.

                 These three options explain — right in the dialog box — what they do.
             11.  Click OK to save the file, then continue to the next exercise.


                  Reduce the Physical File Size
            The CD insert artwork needs to be approximately half the size of the album artwork.
            Reducing the file’s physical size is an easy process, although you need to check the
            positioning of various elements to make sure they meet the output requirements.
            In this exercise you will reduce the file’s physical size, and then make necessary layer
            adjustments to meet the needs of the CD insert.

              1.  With cd-artwork.psd open in Photoshop, choose Image>Image Size.

              2.  Make sure the Resample option is checked.
                 You are resizing this image, which means you are changing the physical dimensions
                 (and the actual number of pixels in the file). If Resample was not checked, you would
                 simply be redistributing the same number of pixels across a different physical space.


                                                                              Project 1: Music CD Artwork  81