


Page 69 - CS6_ID_Look_Inside
P. 69
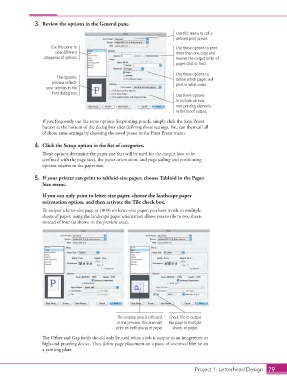
3.  Review the options in the General pane.
                                                                               Use this menu to call a
                                                                               defined print preset.
                           Use this pane to                                    Use these options to print
                             view different                                    more than one copy and
                        categories of options.                                 reverse the output order of
                                                                               pages (last to first).

                                                                               Use these options to
                              The dynamic                                      define which pages will
                            preview reflects                                   print in what order.
                         your settings in the
                            Print dialog box.
                                                                               Use these options
                                                                               to include various
                                                                               non-printing elements
                                                                               in the proof output.

                        If you frequently use the same options for printing proofs, simply click the Save Preset
                        button at the bottom of the dialog box after defining those settings. You can then call all
                        of those same settings by choosing the saved preset in the Print Preset menu.

                    4.  Click the Setup option in the list of categories.
                        These options determine the paper size that will be used for the output (not to be
                        confused with the page size), the paper orientation, and page scaling and positioning
                        options relative to the paper size.

                    5.  If your printer can print to tabloid-size paper, choose Tabloid in the Paper
                        Size menu.
                        If you can only print to letter-size paper, choose the landscape paper
                        orientation option, and then activate the Tile check box.
                        To output a letter-size page at 100% on letter-size paper, you have to tile to multiple
                        sheets of paper; using the landscape paper orientation allows you to tile to two sheets
                        instead of four (as shown in the preview area).


                                                      The overlap area is reflected   Check Tile to output
                                                      in the preview; this area will   the page to multiple
                                                      print on both pieces of paper.  sheets of paper.

                        The Offset and Gap fields should only be used when a job is output to an imagesetter or
                        high-end proofing device. They define page placement on a piece of oversized film or on
                        a printing plate.


                                                                                      Project 1: Letterhead Design  79

