


Page 60 - CC2018_ID_Look_Inside
P. 60
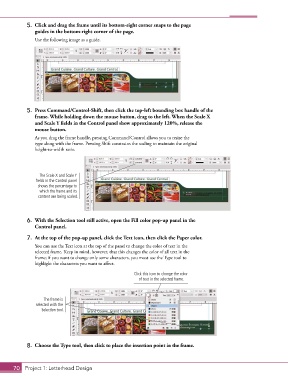
5.  Click and drag the frame until its bottom-right corner snaps to the page
               guides in the bottom-right corner of the page.

               Use the following image as a guide.


            5.  Press Command/Control-Shift, then click the top-left bounding box handle of the
               frame. While holding down the mouse button, drag to the left. When the Scale X
               and Scale Y fields in the Control panel show approximately 120%, release the
               mouse button.

               As you drag the frame handle, pressing Command/Control allows you to resize the
               type along with the frame. Pressing Shift constrains the scaling to maintain the original
               height-to-width ratio.


                 The Scale X and Scale Y
                fields in the Control panel
                 shows the percentage to
                 which the frame and its
                 content are being scaled.


            6.  With the Selection tool still active, open the Fill color pop-up panel in the
               Control panel.
            7.  At the top of the pop-up panel, click the Text icon, then click the Paper color.

               You can use the Text icon at the top of the panel to change the color of text in the
               selected frame. Keep in mind, however, that this changes the color of all text in the
               frame; if you want to change only some characters, you must use the Type tool to
               highlight the characters you want to affect.

                                                        Click this icon to change the color
                                                          of text in the selected frame.


                   The frame is
                selected with the
                  Selection tool.


            8.  Choose the Type tool, then click to place the insertion point in the frame.


       70 Project 1: Letterhead Design

