


Page 43 - CC2017_ID_Look_Inside
P. 43
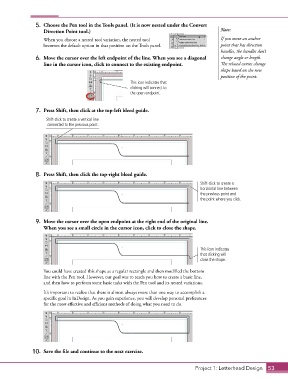
5.  Choose the Pen tool in the Tools panel. (It is now nested under the Convert
                   Direction Point tool.)                                                   Note:

                   When you choose a nested tool variation, the nested tool                 If you move an anchor
                   becomes the default option in that position on the Tools panel.          point that has direction
                                                                                            handles, the handles don’t
                6.  Move the cursor over the left endpoint of the line. When you see a diagonal   change angle or length.
                   line in the cursor icon, click to connect to the existing endpoint.      The related curves change
                                                                                            shape based on the new
                                                                                            position of the point.
                                                       This icon indicates that
                                                       clicking will connect to
                                                       the open endpoint.


                7.  Press Shift, then click at the top-left bleed guide.
                    Shift-click to create a vertical line
                     connected to the previous point.


                8.  Press Shift, then click the top-right bleed guide.
                                                                                    Shift-click to create a
                                                                                    horizontal line between
                                                                                    the previous point and
                                                                                    the point where you click.


                9.  Move the cursor over the open endpoint at the right end of the original line.
                   When you see a small circle in the cursor icon, click to close the shape.


                                                                                    This icon indicates
                                                                                    that clicking will
                                                                                    close the shape.

                   You could have created this shape as a regular rectangle and then modified the bottom
                   line with the Pen tool. However, our goal was to teach you how to create a basic line,
                   and then how to perform some basic tasks with the Pen tool and its nested variations.
                   It’s important to realize that there is almost always more than one way to accomplish a
                   specific goal in InDesign. As you gain experience, you will develop personal preferences
                   for the most effective and efficient methods of doing what you need to do.


               10.  Save the file and continue to the next exercise.


                                                                                  Project 1: Letterhead Design  53

