


Page 46 - CC2017_ID_Look_Inside
P. 46
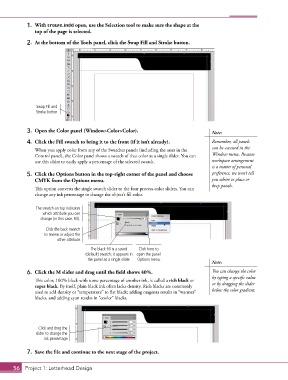
1.  With crowe.indd open, use the Selection tool to make sure the shape at the
               top of the page is selected.

            2.  At the bottom of the Tools panel, click the Swap Fill and Stroke button.


                Swap Fill and
                Stroke button


            3.  Open the Color panel (Window>Color>Color).                              Note:

            4.  Click the Fill swatch to bring it to the front (if it isn’t already).   Remember, all panels
                                                                                        can be accessed in the
               When you apply color from any of the Swatches panels (including the ones in the
               Control panel), the Color panel shows a swatch of that color as a single slider. You can   Window menu. Because
               use this slider to easily apply a percentage of the selected swatch.     workspace arrangement
                                                                                        is a matter of personal
            5.  Click the Options button in the top-right corner of the panel and choose   preference, we won’t tell
               CMYK from the Options menu.                                              you where to place or
                                                                                        keep panels.
               This option converts the single swatch slider to the four process-color sliders. You can
               change any ink percentage to change the object’s fill color.


                The swatch on top indicates
                   which attribute you can
                  change (in this case, Fill).
                    Click the back swatch
                   to review or adjust the
                         other attribute.
                                       The black fill is a saved   Click here to
                                    (default) swatch; it appears in  open the panel
                                     the panel as a single slider.  Options menu.
                                                                                        Note:
            6.  Click the M slider and drag until the field shows 40%.                  You can change the color
                                                                                        by typing a specific value
               This color, 100% black with some percentage of another ink, is called a rich black or   or by dragging the slider
               super black. By itself, plain black ink often lacks density. Rich blacks are commonly
               used to add density or “temperature” to flat black; adding magenta results in “warmer”   below the color gradient.
               blacks, and adding cyan results in “cooler” blacks.


                 Click and drag the
                slider to change the
                   ink percentage.


            7.  Save the file and continue to the next stage of the project.


       56 Project 1: Letterhead Design

