


Page 62 - CS6_AI_Look_Inside.pdf
P. 62
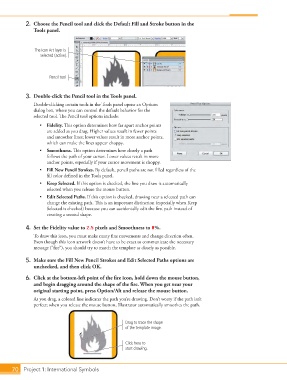
2.  Choose the Pencil tool and click the Default Fill and Stroke button in the
                    Tools panel.


                     The Icon Art layer is
                       selected (active).


                           Pencil tool


                 3.  Double-click the Pencil tool in the Tools panel.
                    Double-clicking certain tools in the Tools panel opens an Options
                    dialog box, where you can control the default behavior for the
                    selected tool. The Pencil tool options include:

                       •  Fidelity. This option determines how far apart anchor points
                          are added as you drag. Higher values result in fewer points
                          and smoother lines; lower values result in more anchor points,
                          which can make the lines appear choppy.
                       •  Smoothness. This option determines how closely a path
                          follows the path of your cursor. Lower values result in more
                          anchor points, especially if your cursor movement is choppy.
                       •  Fill New Pencil Strokes. By default, pencil paths are not filled regardless of the
                          fill color defined in the Tools panel.
                       •  Keep Selected. If this option is checked, the line you draw is automatically
                          selected when you release the mouse button.
                       •  Edit Selected Paths. If this option is checked, drawing near a selected path can
                          change the existing path. This is an important distinction (especially when Keep
                          Selected is checked) because you can accidentally edit the first path instead of
                          creating a second shape.


                 4.  Set the Fidelity value to 2.5 pixels and Smoothness to 0%.
                    To draw this icon, you must make many fine movements and change direction often.
                    Even though this icon artwork doesn’t have to be exact to communicate the necessary
                    message (“fire”), you should try to match the template as closely as possible.

                 5.  Make sure the Fill New Pencil Strokes and Edit Selected Paths options are
                    unchecked, and then click OK.

                 6.  Click at the bottom-left point of the fire icon, hold down the mouse button,
                    and begin dragging around the shape of the fire. When you get near your
                    original starting point, press Option/Alt and release the mouse button.
                    As you drag, a colored line indicates the path you’re drawing. Don’t worry if the path isn’t
                    perfect; when you release the mouse button, Illustrator automatically smoothes the path.


                                                          Drag to trace the shape
                                                          of the template image.


                                                          Click here to
                                                          start drawing.


           70 Project 1: International Symbols

