


Page 52 - CS6_AI_Look_Inside.pdf
P. 52
divide Basic shaPes into comPonent Pieces
               Using the Illustrator Pathfinder panel, you can combine multiple shapes in a variety of
               ways, or you can use one object as a “cookie cutter” to remove or separate one shape
               from another. As you work with more complicated artwork in Illustrator, you will find
               many different ways to use the Pathfinder functions, either alone or in combination.

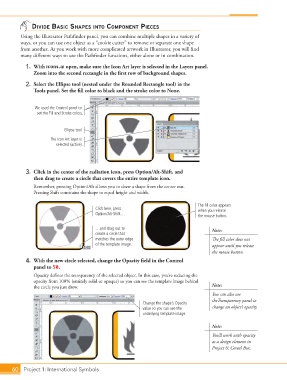
                 1.  With icons.ai open, make sure the Icon Art layer is selected in the Layers panel.
                    Zoom into the second rectangle in the first row of background shapes.

                 2.  Select the Ellipse tool (nested under the Rounded Rectangle tool) in the
                    Tools panel. Set the fill color to black and the stroke color to None.


                     We used the Control panel to
                      set the Fill and Stroke colors.


                                 Ellipse tool
                           The Icon Art layer is
                             selected (active).


                 3.  Click in the center of the radiation icon, press Option/Alt-Shift, and
                    then drag to create a circle that covers the entire template icon.
                    Remember, pressing Option/Alt allows you to draw a shape from the center out.
                    Pressing Shift constrains the shape to equal height and width.

                                                                                        The fill color appears
                                              Click here, press                         when you release
                                              Option/Alt-Shift…                         the mouse button.


                                              …and drag out to                               Note:
                                              create a circle that
                                              matches the outer edge                         The fill color does not
                                              of the template image.                         appear until you release
                                                                                             the mouse button.
                 4.  With the new circle selected, change the Opacity field in the Control
                    panel to 50.
                    Opacity defines the transparency of the selected object. In this case, you’re reducing the
                    opacity from 100% (entirely solid or opaque) so you can see the template image behind
                    the circle you just drew.                                                Note:
                                                                                             You can also use
                                                                                             theTransparency panel to
                                                                 Change the shape’s Opacity
                                                                 value so you can see the    change an object’s opacity.
                                                                 underlying template image.

                                                                                             Note:
                                                                                             You’ll work with opacity
                                                                                             as a design element in
                                                                                             Project 6: Cereal Box.


           60 Project 1: International Symbols

