


Page 47 - CS6_AI_Look_Inside.pdf
P. 47
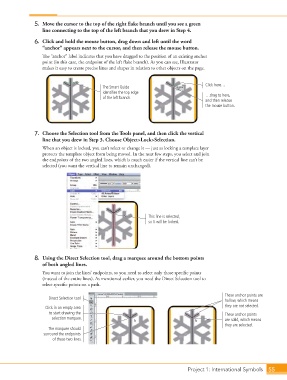
5.  Move the cursor to the top of the right flake branch until you see a green
                        line connecting to the top of the left branch that you drew in Step 4.

                    6.  Click and hold the mouse button, drag down and left until the word
                        “anchor” appears next to the cursor, and then release the mouse button.
                        The “anchor” label indicates that you have dragged to the position of an existing anchor
                        point (in this case, the endpoint of the left flake branch). As you can see, Illustrator
                        makes it easy to create precise lines and shapes in relation to other objects on the page.


                                                                                           Click here…
                                                 The Smart Guide
                                                 identifies the top edge
                                                 of the left branch.                       …drag to here,
                                                                                           and then release
                                                                                           the mouse button.


                    7.  Choose the Selection tool from the Tools panel, and then click the vertical
                        line that you drew in Step 3. Choose Object>Lock>Selection.
                        When an object is locked, you can’t select or change it — just as locking a template layer
                        protects the template object from being moved. In the next few steps, you select and join
                        the endpoints of the two angled lines, which is much easier if the vertical line can’t be
                        selected (you want the vertical line to remain unchanged).


                                                                   This line is selected,
                                                                   so it will be locked.


                    8.  Using the Direct Selection tool, drag a marquee around the bottom points
                        of both angled lines.
                        You want to join the lines’ endpoints, so you need to select only those specific points
                        (instead of the entire lines). As mentioned earlier, you need the Direct Selection tool to
                        select specific points on a path.

                                                                                                   These anchor points are
                          Direct Selection tool
                                                                                                   hollow, which means
                         Click in an empty area                                                    they are not selected.
                           to start drawing the                                                    These anchor points
                            selection marquee.                                                     are solid, which means
                                                                                                   they are selected.
                          The marquee should
                        surround the endpoints
                            of these two lines.


                                                                                   Project 1: International Symbols  55

