


Page 48 - CS6_AI_Look_Inside.pdf
P. 48
9.  Choose Object>Path>Join.
                    This command connects any two selected open endpoints. If the selected points overlap,
                    as in this exercise, the two points are simply combined into a single corner endpoint. If
                    the two selected points do not overlap, Illustrator automatically connects them with a
                    straight line segment.

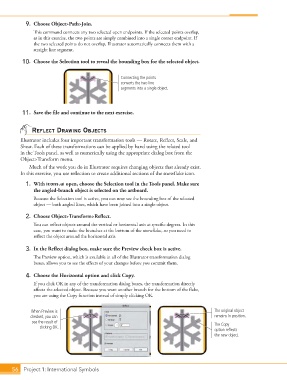
                10.  Choose the Selection tool to reveal the bounding box for the selected object.


                                                        Connecting the points
                                                        converts the two line
                                                        segments into a single object.


                11.  Save the file and continue to the next exercise.


                   reFlect drawing oBjects
               Illustrator includes four important transformation tools — Rotate, Reflect, Scale, and
               Shear. Each of these transformations can be applied by hand using the related tool
               in the Tools panel, as well as numerically using the appropriate dialog box from the
               Object>Transform menu.
                  Much of the work you do in Illustrator requires changing objects that already exist.
               In this exercise, you use reflection to create additional sections of the snowflake icon.

                 1.  With icons.ai open, choose the Selection tool in the Tools panel. Make sure
                    the angled-branch object is selected on the artboard.
                    Because the Selection tool is active, you can now see the bounding box of the selected
                    object — both angled lines, which have been joined into a single object.

                 2.  Choose Object>Transform>Reflect.
                    You can reflect objects around the vertical or horizontal axis at specific degrees. In this
                    case, you want to make the branches at the bottom of the snowflake, so you need to
                    reflect the object around the horizontal axis.

                 3.  In the Reflect dialog box, make sure the Preview check box is active.
                    The Preview option, which is available in all of the Illustrator transformation dialog
                    boxes, allows you to see the effects of your changes before you commit them.

                 4.  Choose the Horizontal option and click Copy.
                    If you click OK in any of the transformation dialog boxes, the transformation directly
                    affects the selected object. Because you want another branch for the bottom of the flake,
                    you are using the Copy function instead of simply clicking OK.


                   When Preview is                                                            The original object
                   checked, you can                                                           remains in position.
                    see the result of                                                         The Copy
                       clicking OK.
                                                                                              option reflects
                                                                                              the new object.


           56 Project 1: International Symbols

