


Page 30 - CC 2019 WD Look Inside
P. 30
Copy and Paste Selected Pixels
         In the previous exercise, you used the Move tool to drag an entire layer. You can
         also use a variety of selection tools to choose only certain areas of a layer that will be
         moved. In this exercise, you will use the most basic selection tool — the Rectangle
         Marquee tool.

           1.  With aftermath.psd open, choose View>Fit on Screen to show the entire
               image centered in the document window.
           2.  Open the file Skyline.jpg from your WIP>Movie folder.

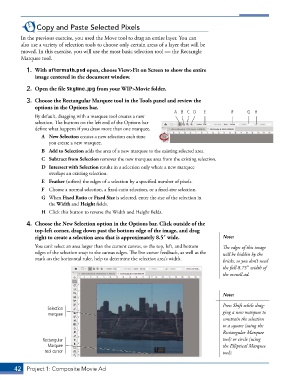
           3.  Choose the Rectangular Marquee tool in the Tools panel and review the
              options in the Options bar.
                                                                    A B C D     E         F     G  H
               By default, dragging with a marquee tool creates a new
               selection. The buttons on the left end of the Options bar
               define what happens if you draw more than one marquee.
                 A  New Selection creates a new selection each time
                    you create a new marquee.
                 B  Add to Selection adds the area of a new marquee to the existing selected area.
                 C  Subtract from Selection removes the new marquee area from the existing selection.
                 D  Intersect with Selection results in a selection only where a new marquee
                    overlaps an existing selection.
                 E  Feather (soften) the edges of a selection by a specified number of pixels.
                 F  Choose a normal selection, a fixed-ratio selection, or a fixed-size selection.
                 G  When Fixed Ratio or Fixed Size is selected, enter the size of the selection in
                    the Width and Height fields.
                 H  Click this button to reverse the Width and Height fields.

           4.  Choose the New Selection option in the Options bar. Click outside of the
              top-left corner, drag down past the bottom edge of the image, and drag
              right to create a selection area that is approximately 8.53 wide.        Note:
               You can’t select an area larger than the current canvas, so the top, left, and bottom   The edges of this image
               edges of the selection snap to the canvas edges. The live cursor feedback, as well as the   will be hidden by the
               mark on the horizontal ruler, help to determine the selection area’s width.   bricks, so you don’t need
                                                                                       the full 8.753 width of
                                                                                       the overall ad.


                                                                                       Note:

                                                                                       Press Shift while drag-
                   Selection
                    marquee                                                            ging a new marquee to
                                                                                       constrain the selection
                                                                                       to a square (using the
                                                                                       Rectangular Marquee
                 Rectangular                                                           tool) or circle (using
                   Marquee                                                             the Elliptical Marquee
                  tool cursor                                                          tool).


       42  Project 1: Composite Movie Ad

