


Page 31 - CC 2019 WD Look Inside
P. 31
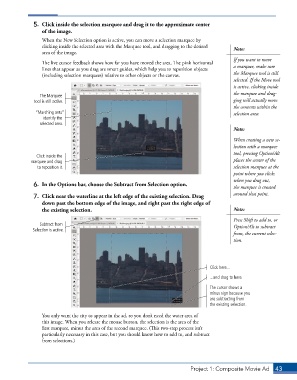
5.  Click inside the selection marquee and drag it to the approximate center
                 of the image.
                 When the New Selection option is active, you can move a selection marquee by
                 clicking inside the selected area with the Marquee tool, and dragging to the desired   Note:
                 area of the image.
                                                                                           If you want to move
                 The live cursor feedback shows how far you have moved the area. The pink horizontal
                 lines that appear as you drag are smart guides, which help you to reposition objects   a marquee, make sure
                 (including selection marquees) relative to other objects or the canvas.   the Marquee tool is still
                                                                                           selected. If the Move tool
                                                                                           is active, clicking inside
                                                                                           the marquee and drag-
                The Marquee
              tool is still active.                                                        ging will actually move
                                                                                           the contents within the
               “Marching ants”                                                             selection area.
                  identify the
                selected area.
                                                                                           Note:

                                                                                           When creating a new se-
                                                                                           lection with a marquee
                                                                                           tool, pressing Option/Alt
               Click inside the
             marquee and drag                                                              places the center of the
               to reposition it.                                                           selection marquee at the
                                                                                           point where you click;
                                                                                           when you drag out,
              6.  In the Options bar, choose the Subtract from Selection option.           the marquee is created
              7.  Click near the waterline at the left edge of the existing selection. Drag   around that point.
                 down past the bottom edge of the image, and right past the right edge of
                 the existing selection.                                                   Note:
                                                                                           Press Shift to add to, or
                Subtract from                                                              Option/Alt to subtract
              Selection is active.
                                                                                           from, the current selec-
                                                                                           tion.


                                                                                  Click here...
                                                                                  ...and drag to here.
                                                                                  The cursor shows a
                                                                                  minus sign because you
                                                                                  are subtracting from
                                                                                  the existing selection.

                 You only want the city to appear in the ad, so you don’t need the water area of
                 this image. When you release the mouse button, the selection is the area of the
                 first marquee, minus the area of the second marquee. (This two-step process isn’t
                 particularly necessary in this case, but you should know how to add to, and subtract
                 from selections.)


                                                                          Project 1: Composite Movie Ad    43

