


Page 55 - CS6_GD_Look_Inside.pdf
P. 55
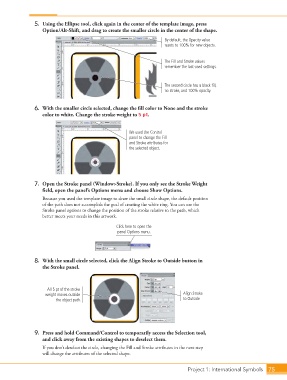
5.  Using the Ellipse tool, click again in the center of the template image, press
                        Option/Alt-Shift, and drag to create the smaller circle in the center of the shape.

                                                                          By default, the Opacity value
                                                                          resets to 100% for new objects.


                                                                          The Fill and Stroke values
                                                                          remember the last-used settings.


                                                                          The second circle has a black fill,
                                                                          no stroke, and 100% opacity.


                    6.  With the smaller circle selected, change the fill color to None and the stroke
                        color to white. Change the stroke weight to 5 pt.


                                                           We used the Control
                                                           panel to change the Fill
                                                           and Stroke attributes for
                                                           the selected object.


                    7.  Open the Stroke panel (Window>Stroke). If you only see the Stroke Weight
                        field, open the panel’s Options menu and choose Show Options.
                        Because you used the template image to draw the small circle shape, the default position
                        of the path does not accomplish the goal of creating the white ring. You can use the
                        Stroke panel options to change the position of the stroke relative to the path, which
                        better meets your needs in this artwork.

                                                      Click here to open the
                                                       panel Options menu.


                    8.  With the small circle selected, click the Align Stroke to Outside button in
                        the Stroke panel.


                          All 5 pt of the stroke
                         weight moves outside                                     Align Stroke
                             the object path.                                     to Outside


                    9.  Press and hold Command/Control to temporarily access the Selection tool,
                        and click away from the existing shapes to deselect them.

                        If you don’t deselect the circle, changing the Fill and Stroke attributes in the next step
                        will change the attributes of the selected shape.


                                                                                   Project 1: International Symbols  75

