
Page 50 - Adobe Graphic Design CC 2020
P. 50
Create Artwork with Lines
The Hiker icon is a perfect candidate for drawing with lines — which makes it ideal
for introducing the Line Segment tool. In this exercise, you combine simple lines
with other basic shapes to create the final icon.
1. With icons.ai open, make sure the Icon Art layer is active. Make the hiker
template art prominent in the document window.
2. Choose the Line Segment tool in the Tools panel. Using the Control panel,
set the Fill to None and the Stroke to 1-pt Black.
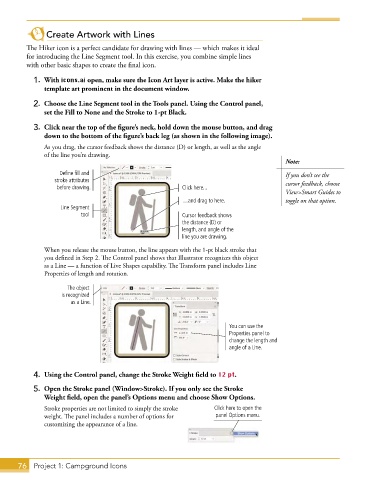
3. Click near the top of the figure’s neck, hold down the mouse button, and drag
down to the bottom of the figure’s back leg (as shown in the following image).
As you drag, the cursor feedback shows the distance (D) or length, as well as the angle
of the line you’re drawing.
Note:
Define fill and If you don’t see the
stroke attributes cursor feedback, choose
before drawing. Click here...
View>Smart Guides to
…and drag to here. toggle on that option.
Line Segment
tool Cursor feedback shows
the distance (D) or
length, and angle of the
line you are drawing.
When you release the mouse button, the line appears with the 1-pt black stroke that
you defined in Step 2. The Control panel shows that Illustrator recognizes this object
as a Line — a function of Live Shapes capability. The Transform panel includes Line
Properties of length and rotation.
The object
is recognized
as a Line.
You can use the
Properties panel to
change the length and
angle of a Line.
4. Using the Control panel, change the Stroke Weight field to 12 pt.
5. Open the Stroke panel (Window>Stroke). If you only see the Stroke
Weight field, open the panel’s Options menu and choose Show Options.
Stroke properties are not limited to simply the stroke Click here to open the
weight. The panel includes a number of options for panel Options menu.
customizing the appearance of a line.
76 Project 1: Campground Icons