
Page 55 - Adobe Graphic Design CC 2020
P. 55
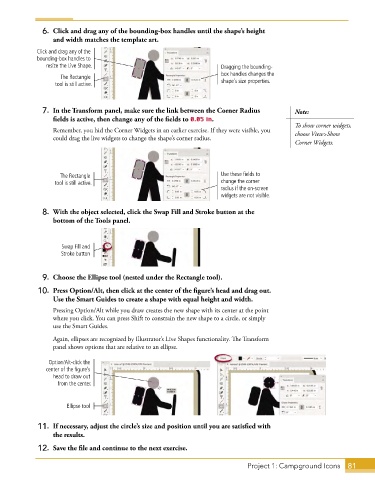
6.  Click and drag any of the bounding-box handles until the shape’s height
                 and width matches the template art.
            Click and drag any of the
            bounding-box handles to
               resize the Live Shape.                                Dragging the bounding-
                                                                     box handles changes the
                    The Rectangle
                  tool is still active.                              shape’s size properties.


              7.  In the Transform panel, make sure the link between the Corner Radius     Note:
                 fields is active, then change any of the fields to 0.05 in.
                                                                                           To show corner widgets,
                 Remember, you hid the Corner Widgets in an earlier exercise. If they were visible, you   choose View>Show
                 could drag the live widgets to change the shape’s corner radius.
                                                                                           Corner Widgets.


                   The Rectangle                                    Use these fields to
                  tool is still active.                             change the corner
                                                                    radius if the on-screen
                                                                    widgets are not visible.


              8.  With the object selected, click the Swap Fill and Stroke button at the
                 bottom of the Tools panel.


                    Swap Fill and
                    Stroke button


              9.  Choose the Ellipse tool (nested under the Rectangle tool).
             10.  Press Option/Alt, then click at the center of the figure’s head and drag out.
                 Use the Smart Guides to create a shape with equal height and width.
                 Pressing Option/Alt while you draw creates the new shape with its center at the point
                 where you click. You can press Shift to constrain the new shape to a circle, or simply
                 use the Smart Guides.

                 Again, ellipses are recognized by Illustrator’s Live Shapes functionality. The Transform
                 panel shows options that are relative to an ellipse.

                Option/Alt-click the
               center of the figure’s
                 head to draw out
                   from the center.


                     Ellipse tool

             11.  If necessary, adjust the circle’s size and position until you are satisfied with
                 the results.
             12.  Save the file and continue to the next exercise.


                                                                             Project 1: Campground Icons   81