


Page 22 - CC2018_PS_Look_Inside
P. 22
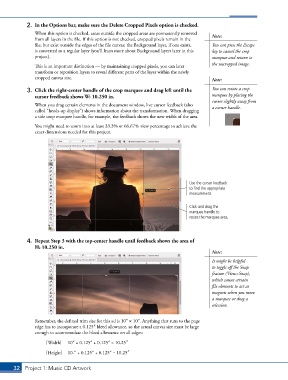
2.  In the Options bar, make sure the Delete Cropped Pixels option is checked.
               When this option is checked, areas outside the cropped areas are permanently removed   Note:
               from all layers in the file. If this option is not checked, cropped pixels remain in the
               file, but exist outside the edges of the file canvas; the Background layer, if one exists,   You can press the Escape
               is converted to a regular layer (you’ll learn more about Background layers later in this   key to cancel the crop
               project).                                                                marquee and return to
               This is an important distinction — by maintaining cropped pixels, you can later   the uncropped image.
               transform or reposition layers to reveal different parts of the layer within the newly
               cropped canvas size.                                                     Note:

            3.  Click the right-center handle of the crop marquee and drag left until the   You can rotate a crop
               cursor feedback shows W: 10.250 in.                                      marquee by placing the
                                                                                        cursor slightly away from
               When you drag certain elements in the document window, live cursor feedback (also   a corner handle.
               called “heads-up display”) shows information about the transformation. When dragging
               a side crop marquee handle, for example, the feedback shows the new width of the area.

               You might need to zoom into at least 33.3% or 66.67% view percentage to achieve the
               exact dimensions needed for this project.


                                                                               Use the cursor feedback
                                                                               to find the appropriate
                                                                               measurement.

                                                                               Click and drag the
                                                                               marquee handle to
                                                                               resize the marquee area.


            4.  Repeat Step 3 with the top-center handle until feedback shows the area of
               H: 10.250 in.
                                                                                        Note:
                                                                                        It might be helpful
                                                                                        to toggle off the Snap
                                                                                        feature (View>Snap),
                                                                                        which causes certain
                                                                                        file elements to act as
                                                                                        magnets when you move
                                                                                        a marquee or drag a
                                                                                        selection.


               Remember, the defined trim size for this ad is 10″ × 10″. Anything that runs to the page
               edge has to incorporate a 0.125″ bleed allowance, so the actual canvas size must be large
               enough to accommodate the bleed allowance on all edges:

                    [Width]   10″ + 0.125″ + 0.125″ = 10.25″
                    [Height]   10-″ + 0.125″ + 0.125″ = 10.25″


       32 Project 1: Music CD Artwork

