


Page 37 - CC2017_PS_Look_Inside
P. 37
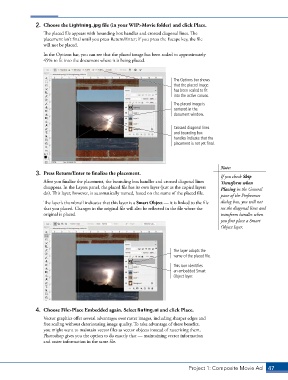
2.  Choose the Lightning.jpg file (in your WIP>Movie folder) and click Place.
                   The placed file appears with bounding box handles and crossed diagonal lines. The
                   placement isn’t final until you press Return/Enter; if you press the Escape key, the file
                   will not be placed.
                   In the Options bar, you can see that the placed image has been scaled to approximately
                   45% to fit into the document where it is being placed.


                                                                         The Options bar shows
                                                                         that the placed image
                                                                         has been scaled to fit
                                                                         into the active canvas.
                                                                         The placed image is
                                                                         centered in the
                                                                         document window.

                                                                         Crossed diagonal lines
                                                                         and bounding box
                                                                         handles indicate that the
                                                                         placement is not yet final.


                                                                                            Note:
                3.  Press Return/Enter to finalize the placement.
                                                                                            If you check Skip
                   After you finalize the placement, the bounding box handles and crossed diagonal lines   Transform when
                   disappear. In the Layers panel, the placed file has its own layer (just as the copied layers   Placing in the General
                   do). This layer, however, is automatically named, based on the name of the placed file.
                                                                                            pane of the Preferences
                   The layer’s thumbnail indicates that this layer is a Smart Object — it is linked to the file   dialog box, you will not
                   that you placed. Changes in the original file will also be reflected in the file where the   see the diagonal lines and
                   original is placed.                                                      transform handles when
                                                                                            you first place a Smart
                                                                                            Object layer.


                                                                         The layer adopts the
                                                                         name of the placed file.

                                                                         This icon identifies
                                                                         an embedded Smart
                                                                         Object layer.


                4.  Choose File>Place Embedded again. Select Rating.ai and click Place.
                   Vector graphics offer several advantages over raster images, including sharper edges and
                   free scaling without deteriorating image quality. To take advantage of these benefits,
                   you might want to maintain vector files as vector objects instead of rasterizing them.
                   Photoshop gives you the option to do exactly that — maintaining vector information
                   and raster information in the same file.


                                                                               Project 1: Composite Movie Ad    47

