
Page 56 - Adobe Photoshop 2021
P. 56
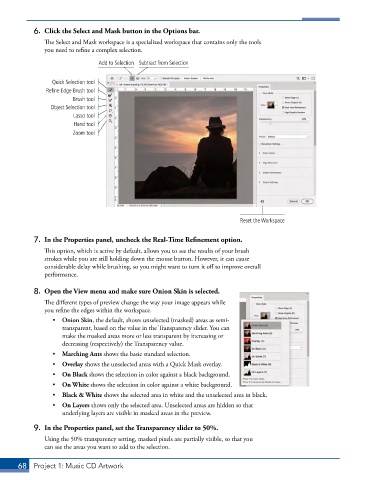
6.  Click the Select and Mask button in the Options bar.
               The Select and Mask workspace is a specialized workspace that contains only the tools
               you need to refine a complex selection.
                               Add to Selection Subtract from Selection


                 Quick Selection tool
               Refine Edge Brush tool
                       Brush tool
                Object Selection tool
                       Lasso tool
                        Hand tool
                       Zoom tool


                                                                          Reset the Workspace


           7.  In the Properties panel, uncheck the Real-Time Refinement option.
               This option, which is active by default, allows you to see the results of your brush
               strokes while you are still holding down the mouse button. However, it can cause
               considerable delay while brushing, so you might want to turn it off to improve overall
               performance.

           8.  Open the View menu and make sure Onion Skin is selected.
               The different types of preview change the way your image appears while
               you refine the edges within the workspace.
                 •  Onion Skin, the default, shows unselected (masked) areas as semi-
                    transparent, based on the value in the Transparency slider. You can
                    make the masked areas more or less transparent by increasing or
                    decreasing (respectively) the Transparency value.
                 •  Marching Ants shows the basic standard selection.
                 •  Overlay shows the unselected areas with a Quick Mask overlay.
                 •  On Black shows the selection in color against a black background.
                 •  On White shows the selection in color against a white background.
                 •  Black & White shows the selected area in white and the unselected area in black.
                 •  On Layers shows only the selected area. Unselected areas are hidden so that
                    underlying layers are visible in masked areas in the preview.

           9.  In the Properties panel, set the Transparency slider to 50%.
               Using the 50% transparency setting, masked pixels are partially visible, so that you
               can see the areas you want to add to the selection.


       68  Project 1: Music CD Artwork