


Page 4 - CC2018_ID_Look_Inside
P. 4
Walk-Through
Walk-Through
2
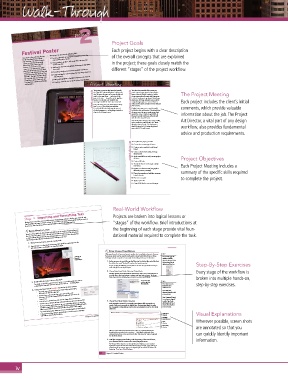
project Project Goals
Festival Poster Each project begins with a clear description
o Creating a file with the appropriate settings for a five-color,
Your client is the marketing director This project incorporates the following skills: of the overall concepts that are explained
for the city department of parks commercially printed poster
and recreation. She wants to create
a poster to advertise the opening o Using gradients, graphics, and image effects to attract the in the project; these goals closely match the
viewer’s attention
festival that kicks off the annual o Adding text elements and applying formatting as appropriate
Summer Concert Series. She
wants to create posters that will be for a poster different “stages” of the project workflow.
plastered all over the city, from local o Threading a single text story across multiple text frames
restaurants and clubs to bus stops and
o Understanding the various options for formatting characters
construction sites that don’t say “Post
No Bills.” This type of poster should
and paragraphs
use very little text set in a large, easy- o Using inline graphics to highlight important text elements
to-read font, and it needs to be eye- o Creating a PDF file that meets the printer’s requirements
catching from a distance, with large,
vivid graphics. Project Meeting The client has provided all the pieces you
The poster to promote this festival is basically
client comments the “play bill,” and we will plaster it all over the art director comments need, so you can get started composing the The Project Meeting
layout. Most of this job is going to involve
city. We want the poster to be very colorful and
compositing multiple images and formatting
vivid, so the main focus — and most of the
text, but I want you to go beyond basic image
poster real estate — should be on the graphics.
placement. InDesign includes many tools for
Each project includes the client’s initial
But the text also has to be readable; this
morning I emailed the text I want to include.
manipulating images; use some of those to
Our posters for past years’ festivals have always
plain pictures.
been 11 1 173, but we’ve been told that
11 1 8.5 will fit in the half-page ad space of make sure this poster consists of more than just comments, which provide valuable
Finally, I want you to use a special metallic
the local newspaper — we’re going to switch to ink for the date and location. That should give
that size for this year’s event. the poster just a bit more visual impact than information about the job. The Project
regular flat colors. I think the gold 8005 in
Pantone’s metallic collection will work well
with the other visual elements.
You already know the page size, and according Art Director, a vital part of any design
to the printer the poster needs a 1/43 bleed
allowance just to be safe. The final posters
should be saved as PDF using the printer’s workflow, also provides fundamental
specs, which I’ll email to you.
advice and production requirements.
project objectives To complete this project, you will:
o Convert the content type of frames
o Create a custom gradient to add visual
impact
o Create a custom frame using an image
clipping path
o Apply visual effects to unify various graphic
elements
o Create a QR code Project Objectives
o Thread the flow of text through multiple
text frames Each Project Meeting includes a
o Format text characters and paragraphs to
effectively convey a message summary of the specific skills required
o Place inline graphics to highlight important
textual elements
o Place text on a path to complete the project.
o Apply a spot color
o Create PDF files for commercial output
Real-World Workflow
Stage 2 Importing and Formatting Text Projects are broken into logical lessons or
Placing text is one of the most critical functions of page-layout software, whether you create the text
directly within InDesign or import it from an external file. InDesign provides all the tools you need to
“stages” of the workflow. Brief introductions at
format text, from choosing a font to automatically creating hanging punctuation.
Now that the graphics for this project are finished, you are ready to begin working on the beginning of each stage provide vital foun-
Define Multiple layers
the text. You are going to create a second layer to hold the text frames; this allows you
to work without distraction from the existing graphics, as well as protect the graphics
dational material required to complete the task.
from being accidentally altered while you are working on the text.
1. With poster.indd open, open the Layers panel.
2. Expand Layer 1 in the panel if necessary, then click the empty space to the
left of the bottom <rectangle> to show that object.
Define Manual fraMe Breaks
When you thread text from one frame to another (or to multiple columns in the same Note:
Click here to frame), you often need to control exactly where a story breaks from frame to frame. You can also toggle the
show the InDesign includes a number of commands for breaking text in precise locations. visibility of hidden
bottom object. characters using the View
1. In the open poster.indd file, use the Type tool to click at the end of the first Options button in the
line (after the word “Festival”) to place the insertion point. Application/Menu bar. Step-By-Step Exercises
As you complete the following exercises, feel free to zoom in as you think necessary to
work with specific areas of your layout.
2. Choose Type>Insert Break Character>Frame Break. Every stage of the workflow is
InDesign provides several special break characters that allow you to control the flow of
text from line to line, from column to column, and from frame to frame. The Frame
Break character forces all following text into the next frame in the thread. broken into multiple hands-on,
3. Double-click the Layer 1 name in the panel. The insertion point Note: step-by-step exercises.
The default in every file is named “Layer 1”, which is not terribly useful when you use
multiple layers. Descriptive names are far better for any asset — including layers.
is at the end of the
Press Enter (numeric
first paragraph.
4. Change the Name field to Graphics and review the other options. keypad) to add a
Column Break.
• The Color menu determines the color of frame edges and bounding
Press Shift-Enter
box handles for objects on that layer.
• If Show Layer is checked, the layer contents are visible in the (numeric keypad) to add
document. You can also change visibility by toggling the eye icon in the
a Frame Break.
Press Command/Control-
• If Lock Layer is checked, you can’t select or change objects on that layer. 3. Choose Type>Show Hidden Characters. Enter (numeric keypad)
Layers panel.
• If Print Layer is checked, the layer will output when you print or export to PDF.
to add a Page Break,
• The Show Guides option allows you to create and display different sets of guides
which pushes all text to
Each paragraph is separated by a paragraph return character (¶). A paragraph can
for different layers; this is a more versatile option than showing or hiding all guides
the first threaded frame
(which occurs with the View>Grids & Guides>Show/Hide Guides toggle).
that a paragraph is technically any copy between two paragraph returns (or other break
• The Lock Guides option allows you to lock and unlock guides on specific layers. consist of only one or two words or multiple lines. The important thing is to realize on the next page.
characters).
• If Suppress Text Wrap When Layer is Hidden is checked, text on underlying
layers reflows when the layer is hidden. Project 2: Festival Poster 107 Frame Break Visual Explanations
character
Paragraph
Return character
Space Wherever possible, screen shots
character
End of Story
character are annotated so that you
When you placed the Frame Break character in Step 2, everything following the
insertion point was pushed to the next frame — including the paragraph return can quickly identify important
character that had been at the end of the first line. This created an “empty” paragraph
that should be deleted.
4. With the insertion point flashing at the beginning of the second frame, information.
press Forward Delete to remove the extra paragraph return.
The Forward Delete key is the one directly below the Help key on most standard
keyboards. If you don’t have a Forward Delete key (if, for example, you’re working on
a laptop), move the insertion point to the beginning of the next line (“Celebrate the
beginning...”) and press Delete/Backspace.
112 Project 2: Festival Poster
iv

